Deploy Exasol - step by step
Follow this step-by-step guide to install and deploy Exasol on Linux hosts.
Exasol is deployed as a Linux application installed in your own infrastructure or on cloud instances on AWS, Azure, or Google Cloud. The system requirements and procedures for deployment and system administration are essentially the same for all platforms.
To learn more about which Linux distributions are supported and about the general software and hardware requirements, see System requirements.
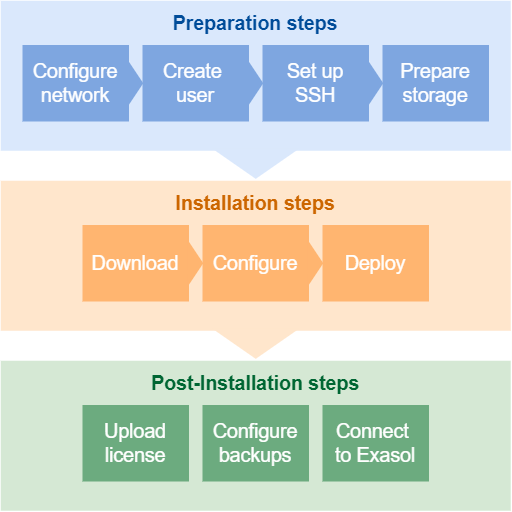
The full deployment procedure consists of three stages: the Preparation stage where you prepare the environment, the Installation stage where you configure and deploy Exasol on the hosts, and the Post-Installation stage, where you can carry out initial system administration tasks and connect to your new Exasol cluster.

Prerequisites
The database hosts must be pre-installed with a supported Linux distribution and meet the minimum system requirements for an Exasol installation. To learn more about hardware and operating system requirements, see System requirements.
If your Exasol system should support the use of GPUs to accelerate UDFs, additional system requirements apply. For more information, see System requirements for GPU support.
If you are deploying Exasol on cloud instances, refer to the cloud service provider’s documentation to learn how to configure network and security settings.
For additional guidelines on how to prepare an optimal environment for an Exasol deployment, including how to secure your system and keep your data safe, see Planning guide.
SSH access
You can run the installation process from a separate Linux system (jump host) or from one of the database hosts. In both cases, the host running the installation will access the other hosts over SSH. If you install Exasol on a single host system without using a jump host, SSH is not required. However, we recommend that you set up SSH anyway, as this enables passwordless login and makes it easier to add more hosts later.
With the default installation procedure, Exasol will be run by a user who has root privileges on the database hosts. To install Exasol for a non-root user, additional configuration steps are required. For more information, see Rootless deployment.
Preparation
Before you install Exasol you must prepare the hosts and the network environment.
Step 1: Configure the network
The first step is to configure the network settings so that the hosts can communicate with each other and with the (optional) jump host on the required ports.
Step 2: Create the installation user
The next step is to create a dedicated user for Exasol on all hosts. This user must have sudo privileges to be able to install and update Exasol.
Step 3: Set up SSH authentication
To allow the hosts to communicate with each other and with the (optional) jump host over SSH, you must configure an SSH key pair and install it on each host.
Step 4: Prepare storage devices
Data in an Exasol database is stored on volumes, which are assigned to storage devices (disks). You must prepare all the storage devices before you continue with the installation.
If your Exasol system should support the use of GPUs to accelerate UDFs, you must install the necessary drivers and additional software for GPU support before you continue to install Exasol.
For more information, see Install and configure GPU support.
Installation
Once the hosts and network have been configured, you can start installing Exasol.
Step 5: Download and install software
Exasol Deployment Tool (c4) is a command-line application that is used to download and deploy Exasol on all platforms. The c4 application can run either on a separate system (jump host) or on one of the database hosts.
Step 6: Create a configuration
In this step you will create a configuration file that c4 will use for the installation. The configuration file defines all necessary parameters such as network addresses, disk devices, and the number of nodes. You must also define some additional configuration parameters if you want to use the Exasol Admin UI, and if you want to enable GPU support for UDFs.
Step 7: Deploy to hosts
When the configuration is prepared, you are ready to start the deployment process. Exasol Deployment Tool (c4) will deploy Exasol over the private network and then start up the database on all nodes. You can make a “dry run” to validate the configuration before you run the actual installation.
Post-installation
When Exasol is up and running you can connect to the database and start loading data using SQL clients and other tools. You can also access the nodes over SSH and manage your system through the different administrative interfaces.
Upload a license
Your new Exasol system is installed with a license that allows you to load 10 GiB of raw data for testing purposes. For larger data sizes, you must purchase a license and upload it to the system.
Configure backups
Creating a backup strategy and configuring regular backups is important to keep your data safe. This step explains how to set up a basic backup schedule after installing Exasol.
Connect to Exasol
When your database is up and running you can connect to it using a database client and start to load data.
Other administrative tasks
To learn more about post-installation system administration tasks such as managing access to the system, adding and managing data volumes and archive volumes, monitoring the system, etc., see the other articles in the Administration section.