Migrate to deployment on existing hardware
Learn how to migrate an Exasol 7.1 database to a new deployment on existing hardware.
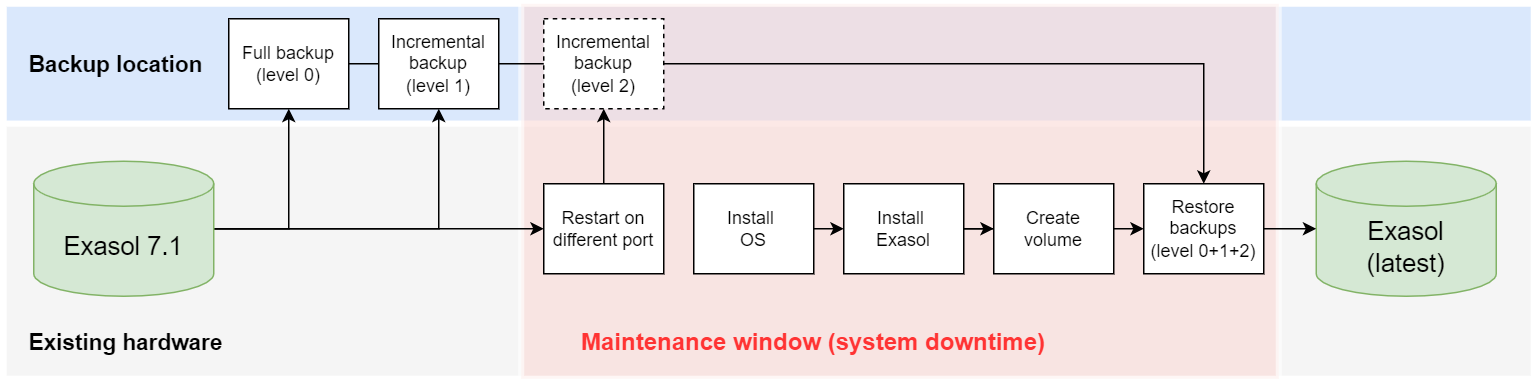
Migrating an Exasol 7.1 database to existing hardware will require a longer maintenance window compared to migrating to new hardware or virtual instances in the cloud, because the existing database must be taken offline before you install the new database.
This deployment option is best suited for installations of Exasol running on bare metal with modern hardware.
Prerequisites
-
The remote archive volume used for Exasol 7.1 backups must be accessible to the new deployment.
-
The hosts must meet the system requirements for an Exasol installation.
-
You must have a valid Exasol license in the new license format. For more information, see Licenses.
Exasol 7.1 licenses are not valid in later versions of Exasol because of differences in the license format. To obtain a valid license, create a support case.
Migration procedure
The migration procedure consists of the following steps:
Files in BucketFS are not included in the database backup. These files must be manually backed up on the 7.1 database and then uploaded to the new Exasol 8 database.
In Exasol 2025.1 and later you can use Exasol Admin to manage buckets and files in BucketFS. In other versions of Exasol you can use an HTTP client or a command-line file transfer tool such as curl to upload and manage files in the buckets.
Step 1: Create a full backup of the Exasol 7.1 database
In Exasol 7.1, create a level 0 (full) backup on a remote archive volume that can also be accessed by the new deployment.
-
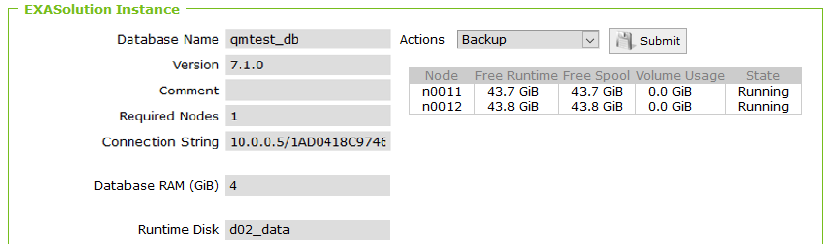
In EXAoperation, go to Services > EXASolution.
-
Click on the database name to show the database properties.
-
In the Actions dropdown, select Backup and click on Submit.
-
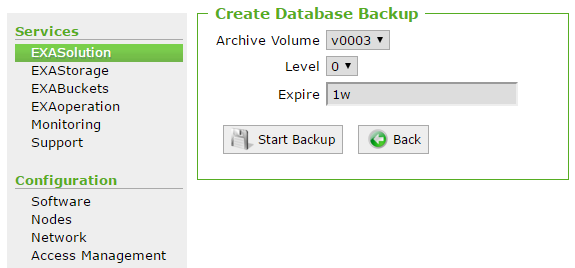
On the Create Database Backup page, select the archive volume to use for the backup.
The archive volume must be accessible to the Exasol deployment.
-
Select Level = 0 and (optionally) enter an expire time for the backup.
-
Click on Start Backup to begin the backup process. The backup will run in the background.
Step 2: Create a level 1 backup of the Exasol 7.1 database
Run a level 1 incremental backup to save any changes that were committed during the level 0 (full) backup.
The procedure is the same as for a level 0 backup, except that you select level 1 in the Create Database Backup dialog.
Step 3: Restart the Exasol 7.1 database on a different port
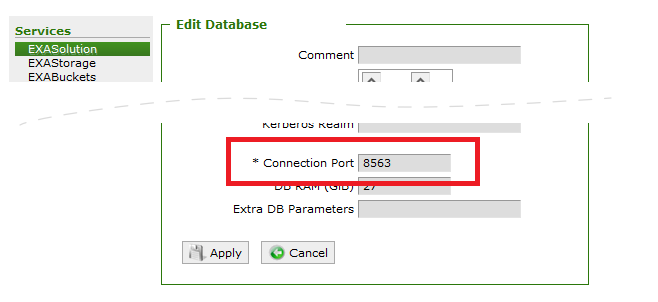
To make sure that clients cannot connect to the Exasol 7.1 database during the migration procedure, you must change the connection port of the database. This step requires that you temporarily stop the database.
The database downtime begins at this point.
-
In EXAoperation, go to Services > EXASolution.
-
Click on the database name to show the database properties.
-
In the Actions dropdown menu, select Shutdown and click on Submit to stop the database.
-
When the database is stopped, click on Edit.
-
On the Edit Database page, enter a new value in the Connection Port field.
-
Click on Apply.
-
In the Actions dropdown menu, select Startup and click on Submit to start the database.
Step 4: Create a level 2 backup of the Exasol 7.1 database
After restarting the database, run a level 2 incremental backup to make sure that any changes to the database since the level 1 backup was started are also backed up.
The procedure is the same as for a level 0 and 1 backups, except that you select level 2 in the Create Database Backup dialog.
Step 5: Shut down the database
After you have backed up the data, shut down the Exasol 7.1 database.
- In EXAoperation, go to Services > EXASolution.
- Click the checkbox next to the database that you want to stop.
- Click on Shutdown.

Step 6: Install OS on the hosts
Install the operating system on the hosts and make sure that they meet all requirements for an Exasol deployment. For more details, see System requirements.
This step means that you will remove Exasol 7.1 completely from the hosts. To roll back in case the migration is not successful, you must reinstall Exasol 7.1 on the hosts and restore the database from the backups.
Step 7: Install Exasol
Create an Exasol deployment with the same number of active nodes as the existing Exasol 7.1 database.
To learn how to install Exasol, see Install Exasol - step by step.
The new database must have the same number of active nodes as the Exasol 7.1 database that was backed up. Otherwise, the backup restore step will fail.
Step 8: Create a remote archive volume in the new deployment
In the new Exasol deployment, create a remote archive volume that points to the source that contains the Exasol 7.1 backup.
The following examples use ConfD through the command-line tool confd_client, which is available on all database nodes. You can also access ConfD through XML-RPC in your own Python programs. For more information, see ConfD.
-
Connect to the cluster operating system (COS) using
c4 connect -i PLAY_ID -s cos.Example:
Copy./c4 connect -i c3275f84 -s cosTo find the play ID, you can use
c4 ps.For more information about how to use c4 commands, see How to use c4How to use c4.
-
To create the remote archive volume, use the ConfD job remote_volume_add with the following parameters:
Parameter name Data type Description urlstring The URL of the remote volume where the 7.1 backup resides.
vol_typestring The type of remote volume.
Vaild volume types:
smb,ftp,sftp,webhdfs,webdav,file,s3,gs,azureownertuple, list The database owner as an integer tuple (user id, group id) or list (user name, user group name). To find the owner, use the ConfD job db_info. usernamestring The username on the remote service. passwordstring The password for the user on the remote service. remote_volume_idstring, integer Enter an ID for the remote volume.
The ID must be over 10000 (5 digits). If you do not enter an ID, one will be created.
remote_volume_namestring Enter a name for the remote volume.
If you do not enter a name, one will be created. Generated remote volume names start at
r0001.optionslist Additional options for the archive volume. See Volume options.
labelslist Additional labels for the volume. Volume options
The following options can be set on the remote volume using the
optionsparameter. You can enter multiple options separated by commas.If the
nocompressionoption is set on the Exasol 7.1 remote archive volume, it must also be set on the archive volume in the new deployment. If the option is not set on one of the volumes, it must also not be set on the other volume.To check which options are set on the Exasol 7.1 archive volume, go to the EXAStorage page in EXAoperation and select the volume. If
nocompressionis included in the Options field, you must also set this option when you create the new volume.Option Description Protocol earlytlsAllow using TLS versions < 1.2 All nocompressionWrite raw (uncompressed) data to the archive volume. All noresumeDisable retrying and resuming file downloads if the server returns an internal error or a partial response. All noverifypeerDisable server certificate check. All proxy=<proxy>Sets CURLOPT_PROXYto the given value.All timeout=<timeout>Value in seconds that will override the default client/server response timeout. For example: timeout=300All verboseWrite more information to the logs. This will be required when troubleshooting problems with backups.
All forcesslUse STARTTLS FTP user=<user>Alternative way to set the access key ID for a remote volume in an S3 bucket. S3 webdavSet this option when using WebDAV for HTTP (unencrypted) URLs. WebDAV delegation_token=<token>Hadoop delegation token when using webhdfs WebHDFS webhdfsSet this option when connecting using the WebHDFS protocol (Apache Hadoop). WebHDFS For example, to create the volume
RemoteArchiveVolume1
in the S3 bucketmy_bucket
:Copyconfd_client remote_volume_add url: https://my_bucket.s3.eu-west-1.amazonaws.com vol_type: s3 remote_volume_name: RemoteArchiveVolume1 username: backup_user password: 123456789 owner: [500,500]For other storage platforms, use the same command but with the appropriate
urlandvol_type. For more information and examples, see Create a remote archive volume. -
To verify that the volume was created, use the ConfD job remote_volume_list. For example:
Copyconfd_client remote_volume_list
- default_logrotation_volume
- default_backup_volume
- RemoteArchiveVolume1 -
To check the properties of the volume, use the ConfD job remote_volume_info with the name of the volume.
For example, if the volume was created in an S3 bucket:
Copyconfd_client remote_volume_info remote_volume_name: RemoteArchiveVolume1
name: RemoteArchiveVolume1
owner:
- 500
- 500
password: 123456789
type: s3
url: https://my_bucket.s3.eu-west-1.amazonaws.com
username: backup_user
vid: '10001'
Step 9: Restore the backup on the new database
Restore the full backup (level 0 + all incremental backups) on the new database. The restore is made from the remote archive volume in the new deployment that points to the same source as the Exasol 7.1 remote archive volume.
To learn how to restore backups, see Restore Database from Backup.
If the nocompression option is set on the Exasol 7.1 remote archive volume, it must also be set on the new archive volume. If the option is not set on one of the volumes, it must also not be set on the other volume. Otherwise, the restore operation will fail.
When the restore operation has completed, the new database will automatically start.
The database downtime ends at this point.
The migration is now complete and the new database should be running with the old data.
Fallback procedure
If the migration is not successful, you have to reinstall Exasol 7.1 on the hosts and restore the database from the backups. You can then start the database on the original port to resume operations. Remember to run a new backup before you shut down the Exasol 7.1 database again to resume the migration procedure.
Support
If you need help with the migration procedure, reach out to our Support team. To get help, create a support case.
Next steps
- Upload backed up UDF scripts and drivers to BucketFS on the new system.
-
If the connection information has changed (hostnames/IP addresses and/or ports in connection strings), make sure that you inform all users and update any external tools and scripts as needed.