Install Exasol on Hardware
This article explains how to install Exasol on physical hardware.
Before you continue, make sure that you have done the required steps in Prepare the Environment.
To install Exasol, carry out the following steps in order:
The first step after preparing the environment is to install the license node, also known as license server or management node. The license node enables the initial installation, configuration, and first boot of all other data nodes. After installing the license node you will be able to access EXAoperation in your web browser and proceed with the following steps in the installation process.
Prerequisites
- You have downloaded the Exasol ISO file from the Exasol Downloads page
- You have carried out the required Preparation steps
Procedure
Do the following to install the license node:
- Boot up the Exasol ISO image.
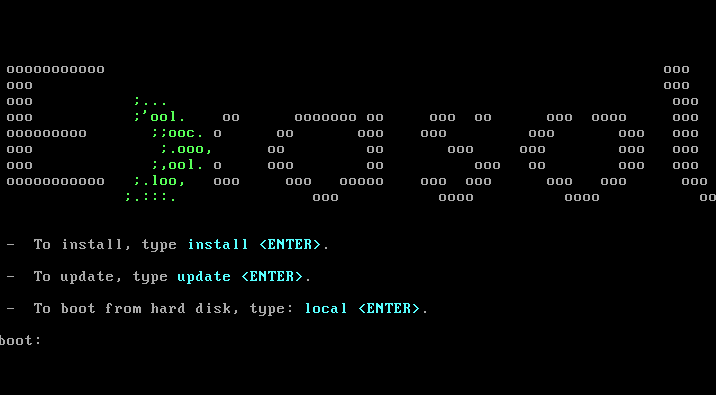
- At the command line prompt, type
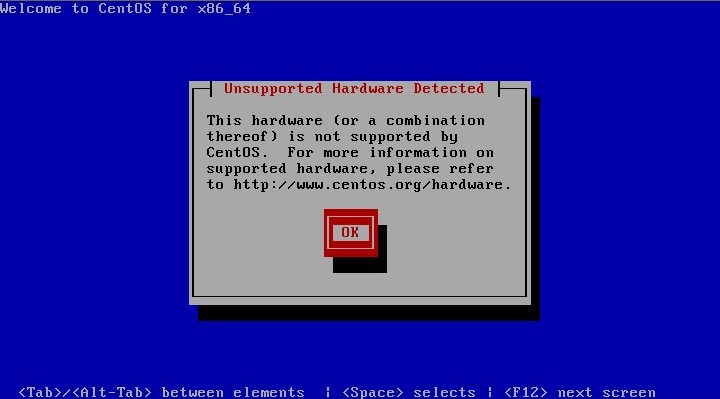
installand press ENTER. - Click on OK to acknowledge the unsupported hardware message (this is a CentOS message).
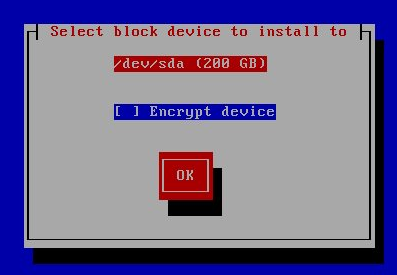
- Enter the hard drive to install to and click on OK to confirm.
Encrypting the device is optional but recommended. When Encrypt device is checked, you must provide a password for the disk when restarting the license server.
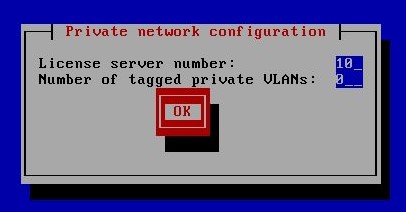
- If there are multiple private networks, enter the number of networks in Number of tagged private VLANs and click on OK.
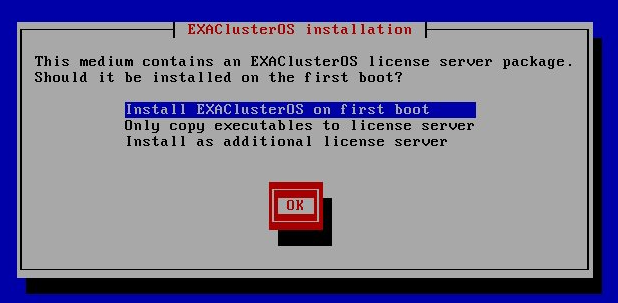
- Select Install EXACluster OS on first boot and select OK.
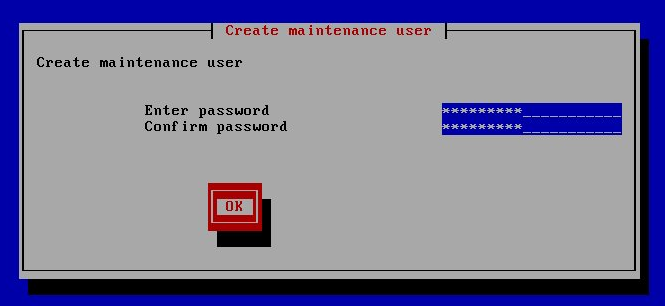
- Set a strong password for the maintenance user and click on OK.
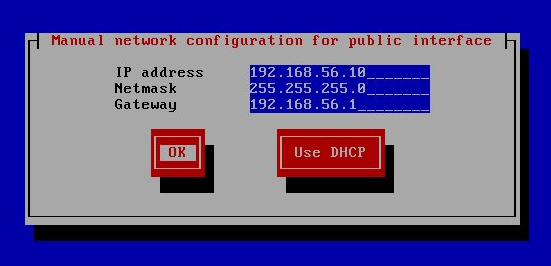
- Set the IP addresses of your network and click on OK (the IP address in the screenshot is an example).
- Check that the network information is correct and change it if necessary. Click on OK to continue.
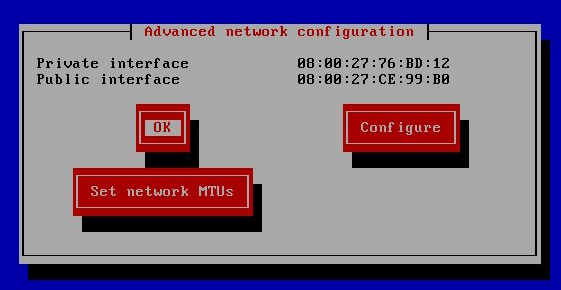
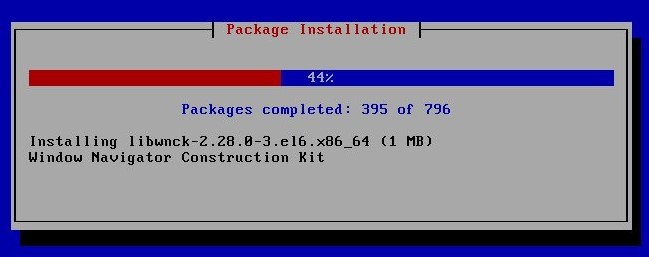
The installation process will now start. Once it has completed, the system will restart automatically.
- Boot up the system from the local hard drive.
Once you have completed these steps, you can get the IP address for the license node by logging in to the terminal (or over SSH) using the login name maintenance and the maintenance password you entered in the Create maintenance user dialog.
When you have installed the license node you can configure access management (users, roles, and passwords) through the EXAoperation interface. The configuration options are available in Configuration > Access Management.
Configuration
Do the following to configure the access management:
- Enter the IP address of the license node in your web browser to launch the EXAoperation user interface.
- Login as an admin user. The default values are username:
adminand password:admin.For security purposes you should change the default Administrator password during the installation procedure. You can also change the password after installation through EXAoperation. For more information, see Add users.
- Perform the following tasks:
Key store
EXAoperation provides an option to use a key store (Hardware Security Module). To use a Key Store, you need 3rd Party software installation on the nodes. Contact Exasol support if you want to use this feature.
After you have configured access management you can configure the cluster network through the EXAoperation user interface. You can assign network settings for the cluster, such as the public network address, default gateway, NTP servers, and other variables. You can also add routes and additional networks if you make use of them.
Configuring the cluster network access include configuring the following settings:
You can use the EXAoperation user interface (Configuration > Network) to configure these settings.
You should be logged into the EXAoperation interface as an admin user.
System settings
Do the following:
- In the
EXAoperation interface, Select Configuration > Network.
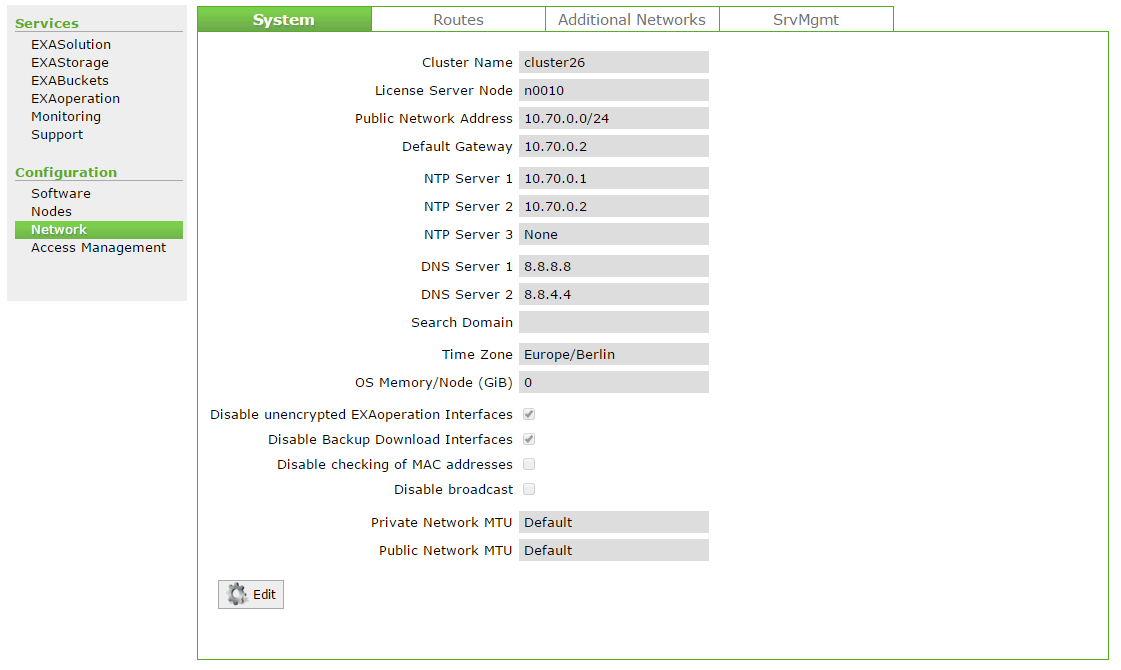
- Click the Edit button in the System tab. You can edit the following parameters:
System Property Value Cluster Name Set the name of the cluster. License Server Node Name of the node operating as the license server (management node). Public Network Address IPv4 subnet address for the data nodes Default Gateway IPv4 address of the subnet gateway for the data nodes NTP Server IPv4 address of the NTP server/s for the cluster DNS Server Optional - set the DNS server(s) Search Domain Optional - set the search domain for the cluster Time Zone Time zone the cluster will run in. On the first start-up of the database, the time zone will also be used for the database. OS Memory per Node (GiB) Specifies the amount of memory dedicated to the OS, and which Exasol cannot use. For more information, see Specify OS Memory Swap for Cluster Node(s).
Set this to 10% of each data node's main memory (for example, 192GiB per node -> 19GiB OS Memory).
Disable unencrypted EXAoperation Interfaces Disables all insecure protocols (HTTP for EXAoperation, FTP for ARCHIVE Volumes).
Disable Backup Download Interfaces Disables all insecure protocols (HTTP for EXAoperation, FTP for ARCHIVE Volumes) for downloading of backups.
Disable MAC Address Checklist Disables checking MAC addresses when the nodes boot up. Checking this option will also disable reordering of network interfaces. Disable Broadcasts Check this option if the network does not allow broadcasts. MTU Maximum Transmission Unit for the network. You can set this for the private and public networks. - Click Apply to save your changes.
Add routes
-
In the EXAoperation interface, Select Configuration > Network.
-
Select the Routes tab.
-
Click Add.
-
Configure the route details and click Add.
Additional networks
You can add the additional networks in Configuration > Network > Additional Networks. The networks can be:
- Private networks (CICN)
- Public networks (CSCN)
Each additional network interface group requires a separate VLAN and physical network interface on each node (MAC address). First, create a new VLAN and then assign the interface to the nodes using the node editor (Configuration > Nodes).
Do the following to add the additional networks:
- In the EXAoperation interface, Select Configuration > Network.
- Select the Additional Networks tab to add a public or private network.
- Specify the following:
- Description: a name for the network
- MTU: The Maximum Transmission Unit for the VLAN. The VLAN MTU must be smaller or equal to the physical interface MTU.
- Bonding network: Select a network to use for bonding (if applicable)
- Network: IP address of the network (public network only). For example,
192.168.16.0/24
Server management
You can add and configure a SrvMgmt group if out-of-band management is used. Do the following:
- In the EXAoperation interface, Select Configuration > Network.
- Select the SrvMgmt tab.
- In the Add SrvMgmt Group screen, configure the following parameters:
- IPMI Type: select the type supported by the vendor you are using.
- Name: Name of the IPMI Group. Once created, it can be later assigned to an interface (e.g. iLO, iDRAC) or a MAC address.
- Public IPMI IP Addresses:
- Option 1: The IPMI interfaces already have IP addresses assigned. Enable the check box and fill in IP addresses in the node editor. This requires the IPMI interfaces to be in the public network (CSCN) or a dedicated VLAN, which in both cases needs to be accessible from all cluster nodes.
- Option 2: The IPMI interfaces are served from the cluster internal DHCP server Fill in the IPMI MAC address in the node editor. IPMI interfaces need to be located in the private network (CICN).
- Username/Password: Credentials for the IPMI card.
After you have configured the cluster network, you can configure the monitoring services for Exasol. The monitoring services are managed using the EXAoperation interface. You can create and configure monitoring services, and you can set the warning and error threshold values for disk usage, swap usage and load.
Creating a monitoring service includes the following steps:
Add a log service (Information ALL)
- In EXAoperation interface, select Services > Monitoring.
- Click Add button in the Add Log Service section.
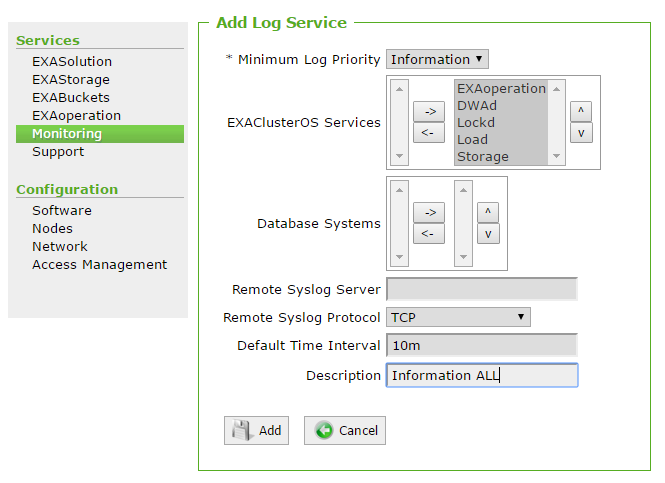
- In the Minimum Log Priority list box, select Information.
- Select all the EXAClusterOS Services available and click the right arrow to add them to the log service.
- Set the default time interval to 10m.
- Set the Description to Information ALL.
- Click Add to add the log service.
Add a log service (Information excluding LOAD)
- In EXAoperation interface, select Services > Monitoring.
- Click Add button in the Add Log Service section.
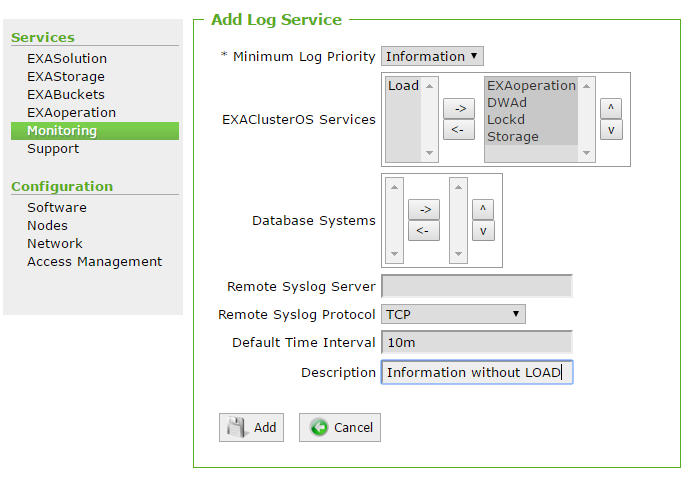
- In the Minimum Log Priority list box, select Information.
- Add all the services except LOAD service from the EXAClusterOS Services.
- Set the default time interval to 10m.
- Set the Description to Information without LOAD.
- Click Add to add the log service.
Set threshold values
Do the following to change the current threshold values:
- In EXAoperation interface, select Services > Monitoring.
- Click Edit button in the Threshold Values section.
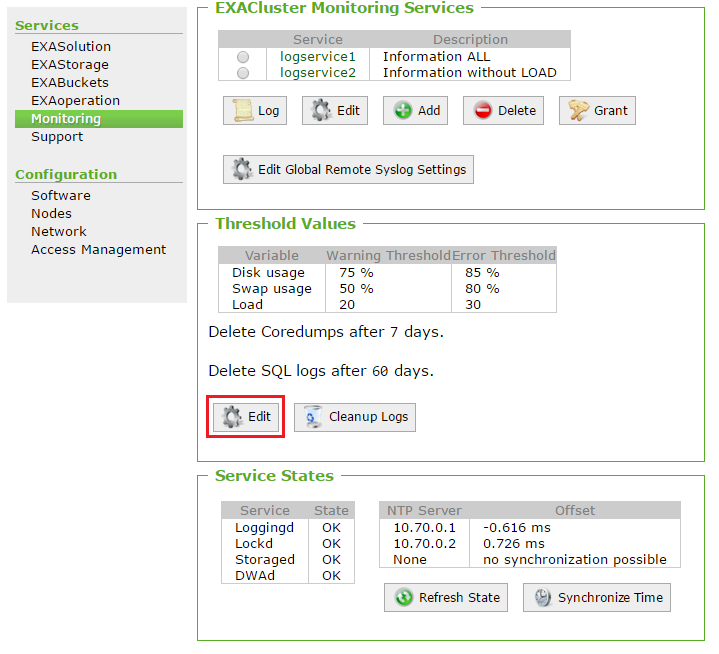
- Set the warning and error thresholds values in the Monitor Threshold section.
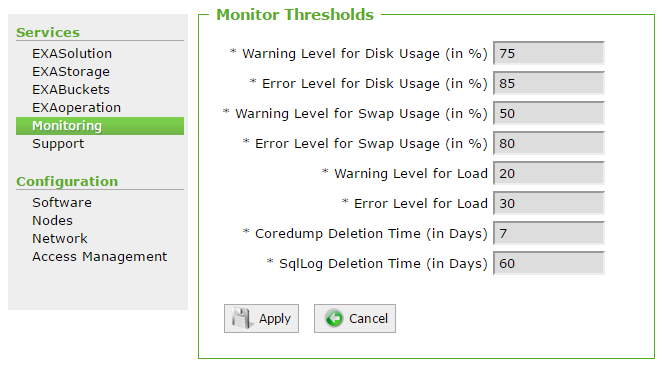
- Click Apply.
To learn more about monitoring services, see Monitoring.
After you have created a monitoring service, you can create the first data node. The settings that you configure here can be copied to create further nodes in the system.
To create the first data node, you have to perform the following tasks:
IP address numbering
When you create a new node, you assign it an internal number and an external number. These numbers determine the IP address of the node on the private and public networks respectively.
- Node number: Determines the last octet of the node’s IP address on the private network (cluster-internal network).
- External number: Determines the last octet of the node’s IP address on the public network (client-side network). This is done by adding the external number assigned to the node to the last octet of the public network address.
Example:
Public IP address + External Number = Node IP address
| Public network IP | Network mask | External number | Node IP |
|---|---|---|---|
| 10.70.0.50 | 255.255.255.0 (24) | 34 | 10.70.0.84 |
| 10.70.0.70 | 255.255.255.0 (24) | 1 | 10.70.0.71 |
Disk layout
The disk layout for a node is configured during the node setup. For a data node, the following four partitions are required:
- OS partition (d00_os): EXACluster OS is installed on this partition. It is an ext4 filesystem with journaling, and is AES 256 encrypted. It should be assigned at least 50 GiB of space.
- Swap partition (d01_swap): Used for swap data. It should be assigned at least 4 GiB of space.
- Data partition (d02_data): Used for database logs and coredumps. It is an ext4 filesystem with journaling. It should be assigned at least 50 GiB of space.
- EXAStorage partition (d03_storage): Used for persistent and temporary database data. It is an EXAStorage partition and runs on one or more physical disks.
For a physical cluster, how you set up your disk layout depends on the hardware setup you have selected - a RAID Mirror with a Software RAID, or a hard drive with a dedicated OS disk.
RAID mirror with software RAID
All hard drives are the same size, and are used by all partitions (OS, Data, Swap and Storage). You configure the node disks as follows:
- Add all disks to the OS, Swap, Data and Storage partitions
- OS, Swap and Data have a disk RAID of 'RAID 0'
- Storage has a disk RAID of 'None'
Example : RAID mirror with software RAID (Dell R710)
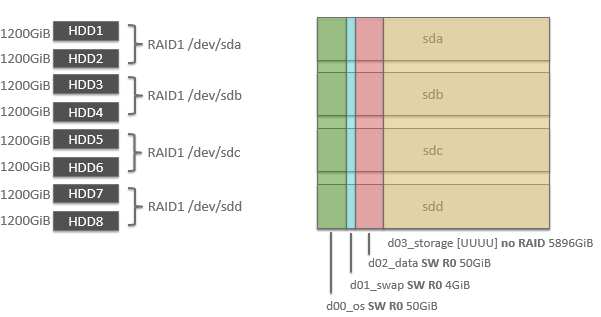
HDD with dedicated OS disk
The OS, Swap and Data partitions have a dedicated hard drive. The hard drive for these partitions is usually smaller than the hard drives for the Storage partition. You configure the node disks as follows:
- Add the dedicated hard drive to the OS, Swap and Data partitions
- Add all other hard drives to the Storage partition
- OS, Swap and Data use the dedicated OS disk
- Storage has a disk RAID of 'None'
Example : HDD with dedicated OS disk (Dell R720XD)
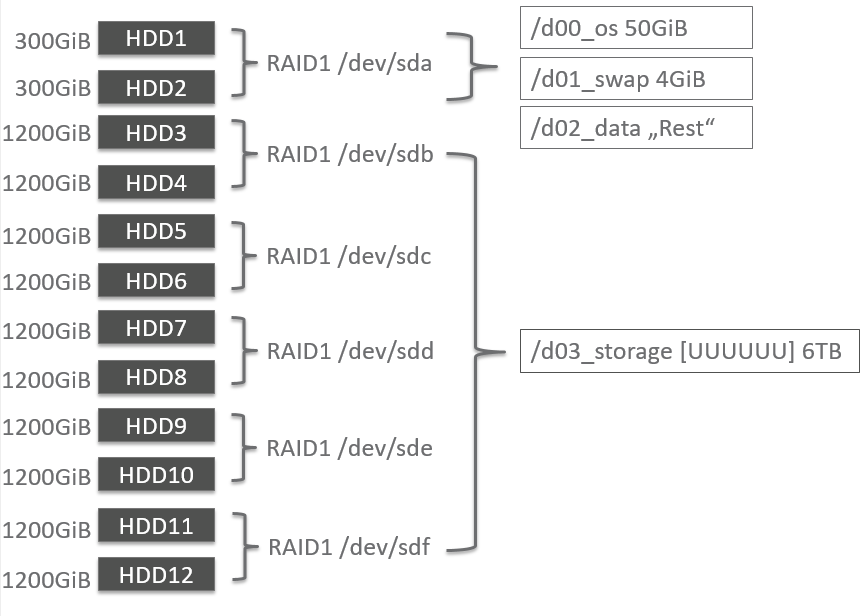
Create a node
Follow these steps to create/add node(s) to the Exasol system:
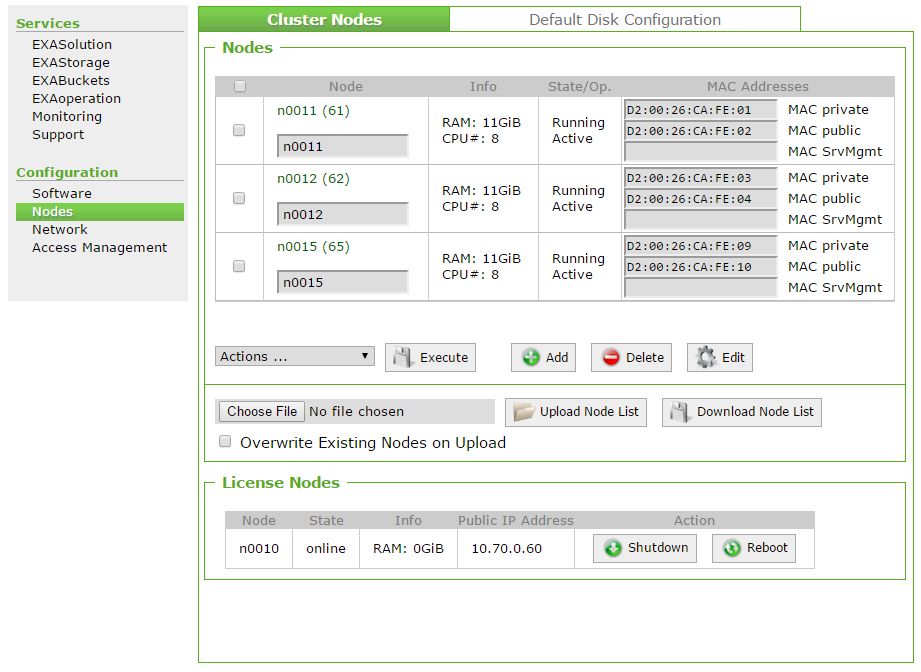
- In EXAoperation, go to Configuration > Nodes. The Cluster Nodes screen is displayed.
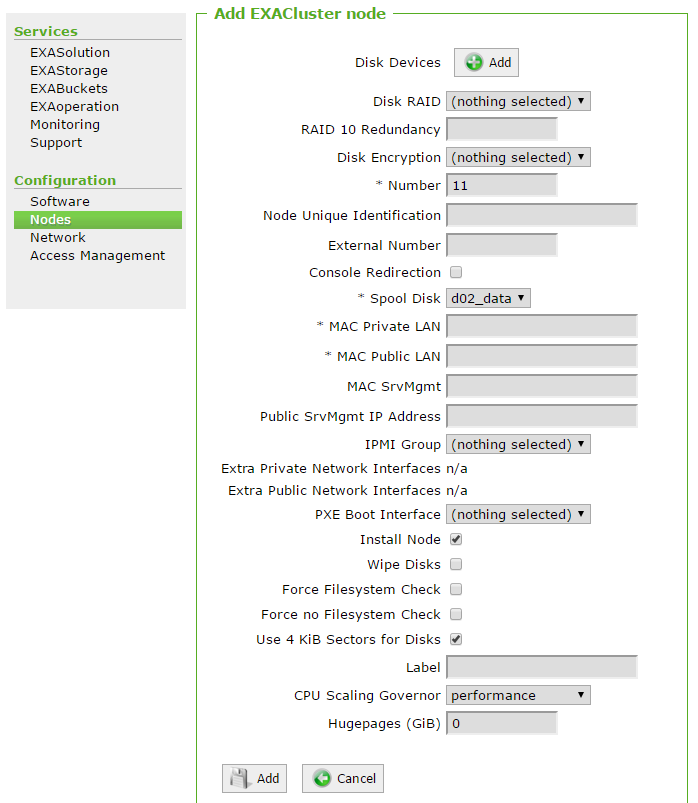
- Click Add. The Add EXACluster node screen is displayed.
- Configure the details of the node being added. For a full description of each property, refer to Configure Node Properties section.
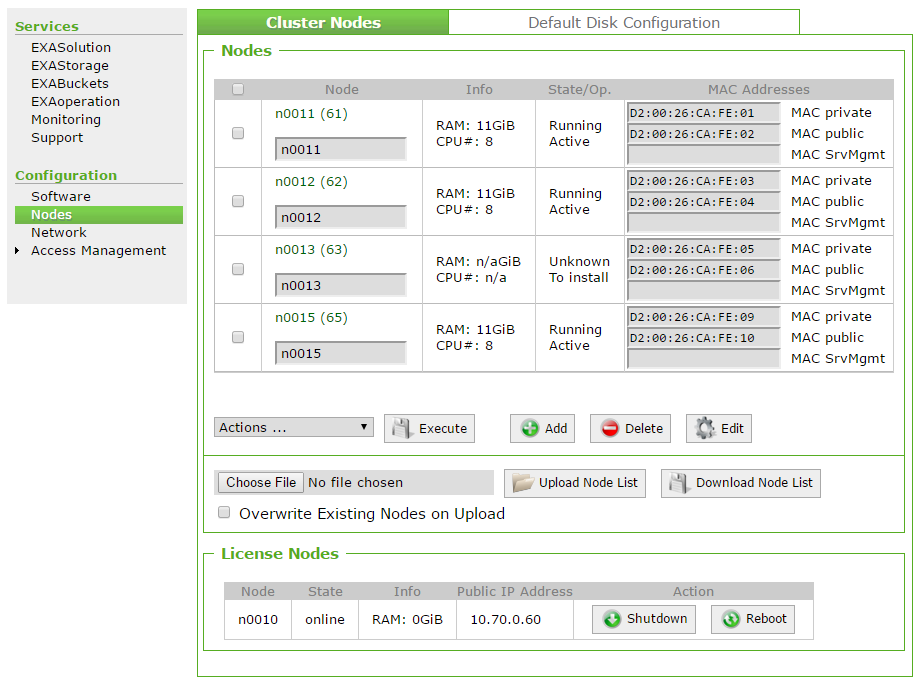
- Click Add to add the node. The new node is listed with the status To Install.
Configure the node disk layout
You can follow the below steps to configure a node disk layout:
- In EXAoperation, go to Configuration > Nodes and click on the node link.
- The Node Information screen is displayed.
- Click Disks. The Disk Information screen is displayed.
- Click Edit to edit the disk. Configure the following for each partition:
- Disk devices: The physical disk(s) that the storage disk runs on. Click Add for each device to add to the partition.
- Disk RAID: Redundancy of the disk.
- Disk encryption: Select the encryption to be used for the partition.
- Disk Label: Name for the partition as it should appear in screens across EXAoperations.
- Size of disk: The maximum space in GiB available to the partition.
The way you configure the disks depends on your hardware setup (refer to Disk Layout). You have the following two options:
RAID mirror with software RAID
Partition Disk device to assign Disk RAID Disk size OS All RAID 0 50GiB Swap All RAID 0 4GiB Data All RAID 0 50 GiB Storage All Select 'None' Leave blank Hard drive with dedicated OS disk
Partition Disk device to assign Disk RAID Disk size OS Dedicated HDD Select 'None' 50GiB Swap Dedicated HDD Select 'None' 4GiB Data Dedicated HDD Select 'None' Leave blank Storage Dedicated HDD Select 'None' Leave blank - Click Apply to save your changes.
Install a node
Follow these steps to install node(s).
- In EXAoperation, go to Configuration > Nodes to open the Cluster Nodes screen.
- Start the node up so that it can complete the installation process. Depending on if you use IPMI or not, you have two options:
- Go to Configuration > Nodes.
- Select the new node and select Startup from the Actions ... drop down list.
- Click Execute to install the node and start it up
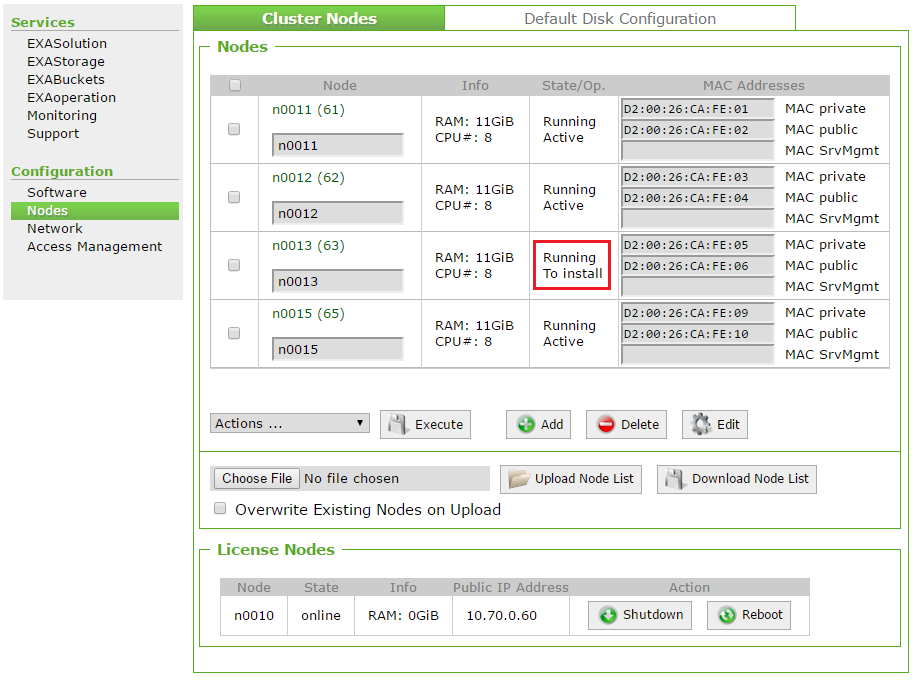
- The node is shown as Running in the State/Op. column.
The node you have just added should be displayed as To Install in the State/Op. column. If not, select the node, and select Set Install Flag from the Actions ... drop down list, and click Execute.
.png)
| Option | Steps |
|---|---|
| No IPMI installed: start node manually | Physically power on the relevant node in the cluster. |
| IPMI is installed: start node using EXAoperation |
|
After you have created the first data node, you can add additional nodes to your system.
Follow these steps to create/add node(s) to the Exasol system:
- In EXAoperation, go to Configuration > Nodes. The Cluster Nodes screen is displayed.
- Click Add. The Add EXACluster node screen is displayed.
- Configure the details of the node being added. For a full description of each property, refer to Configure Node Properties section.
- Click Add to add the node. The new node is listed with the status To Install.


After you have created the nodes you need to activate them.
Follow these steps to activate nodes:
- In EXAoperation, go to Configuration > Nodes. The new nodes are lists with the status Running and To install.
- Select the new nodes, and select Set active flag from the Actions ... drop down list.
-
Click Execute to set the new nodes to active.The State/Op. of the new nodes should be Running and Active.
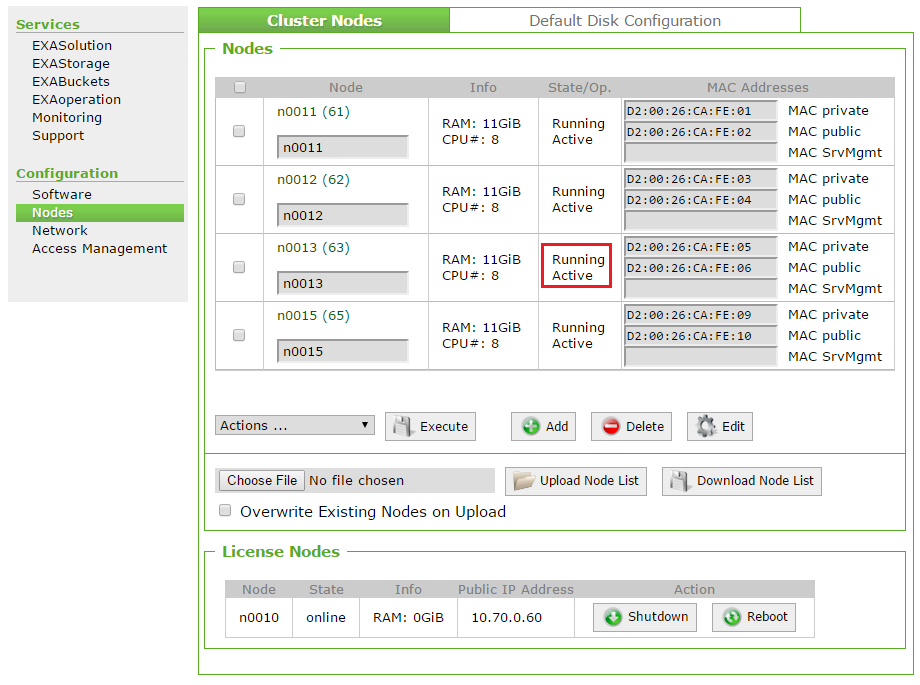

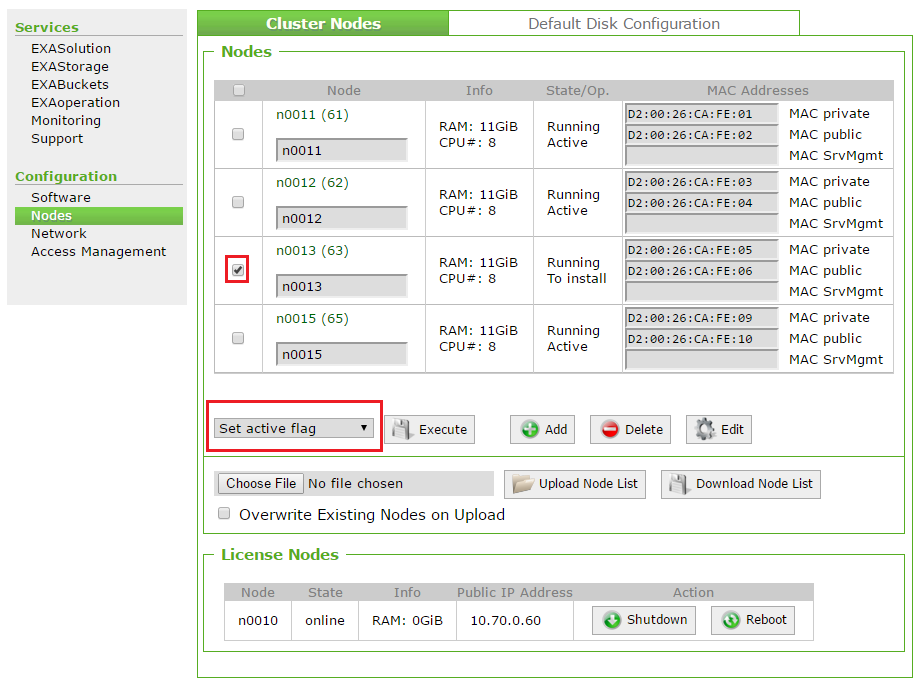
After you activated the data nodes you need to start the EXAStorage service.
Follow these steps to start EXAStorage:
-
In EXAoperation, go to Services > EXAStorage.
When the storage service is not running, the screen looks as follows:
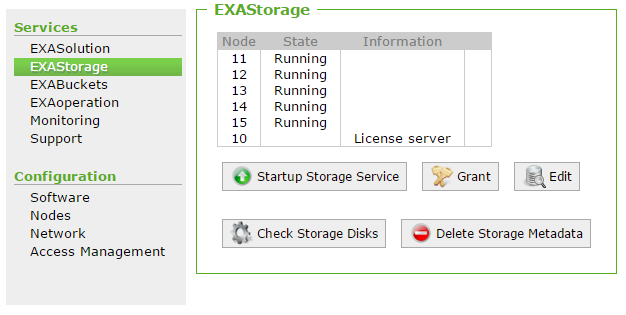
-
Click on Startup Storage Service. The storage service starts up and the screen looks like this after a few minutes:
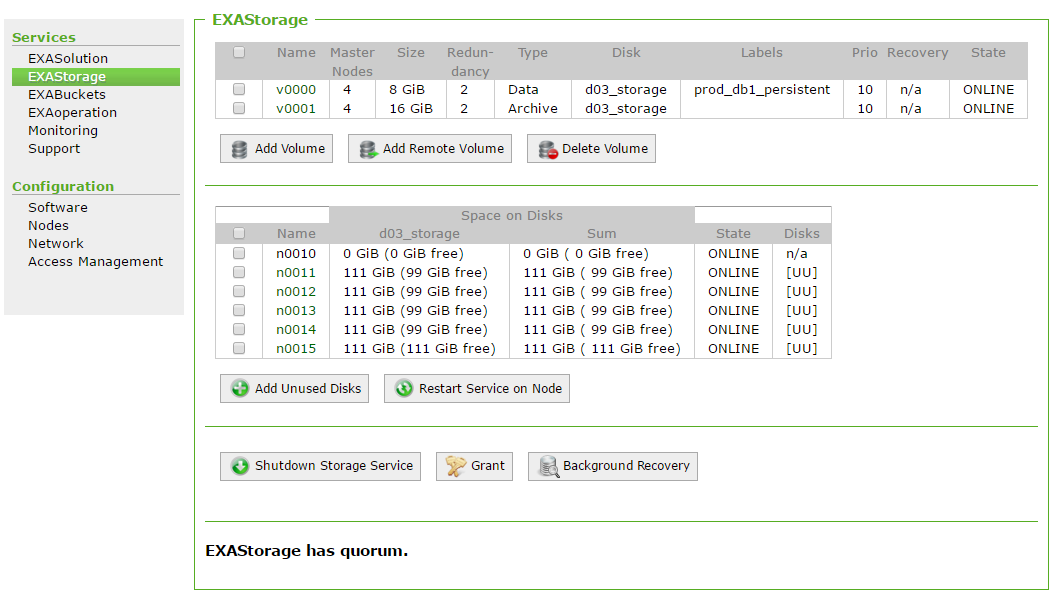
-
Select all disks, then click on Add Unused Disks to make sure that all disks are included when creating a volume in the next step.
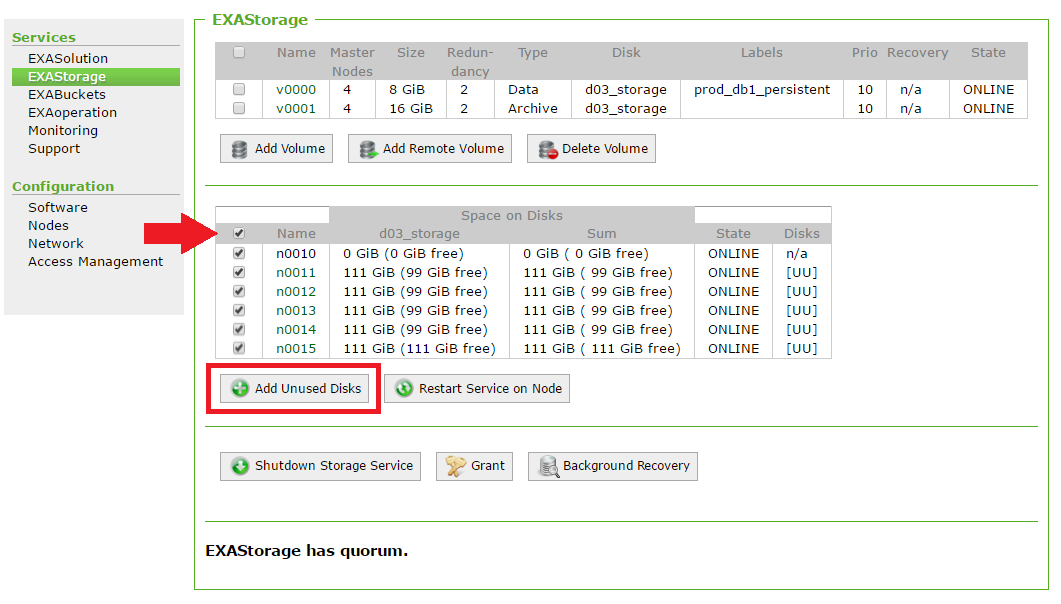
When you have started EXAStorage you can create the data and archive volumes for your system.
This article explains how to create a new data volume in an Exasol database.
Database data in Exasol is stored on data volumes, which are assigned to storage disks. For more information about the different volume types in Exasol, see Volumes Overview. For more information about storage disks, see Storage Overview.
Assign nodes to a volume
When you create a persistent data volume you set the number of master nodes that the volume will use and assign the master nodes to the volume. The master nodes are the active nodes in the cluster. For example: in a cluster that will have 4 active nodes and 1 reserve node (4+1), the number of master nodes is 4.
- The value you set in the Number of Master Nodes field of the Add EXAStorage Volume screen must match the number of nodes you add to the volume's Nodes List.
- The number of master nodes that you define for the volume must match the number of active nodes that you assign to the database when you create it.
Follow these steps to create a data volume:
- In EXAoperation, go to Services > EXAStorage and click Add Volume.
- Enter the properties for the new node, and set the Volume Type to Data.
- Click Add to create the volume. The volume is added to EXAStorage.

| Volume Property | Description |
|---|---|
| Redundancy | The number of copies there are of a data segment. For example, a redundancy of '2' means that there will be two instances of a specific segment of data, stored on separate nodes in the cluster. |
| Label | A descriptive name for the volume. |
| Allowed Users | The users who are permitted to access the volume. These users are able to perform tasks such as backup scheduling, creating databases, etc. |
| Read-only Users |
Users who should have read-only access. Any users that you add as Read-only Users are limited to read-only access, even if they are added to the Allowed Users list. |
| Priority | The priority of the volume in terms of process scheduling priority. A higher number specifies a higher priority. You can use this setting if you have two volumes (and thus two databases) running on the same disks to give one of the databases priority for processing requests. For most cases, you can set the priority to a value of '10' for all volumes. |
| Volume Type | Specifies if the volume is a data volume or an archive volume. |
| Volume Size (GiB) | The maximum size of the data volume in GiB. |
| Nodes List | The nodes that the volume will use. |
| Number of Master Nodes |
The number of active nodes in the cluster. The number you enter in this field must match the number of nodes added in the Nodes List. The number of master nodes that you define for the volume must match the number of active nodes you assign to the database later when you create the Exasol database instance. |
| Block Size (KiB) | Size of the data blocks for the database in KiB. |
| Disk | The storage disk that the volume will be stored on. |
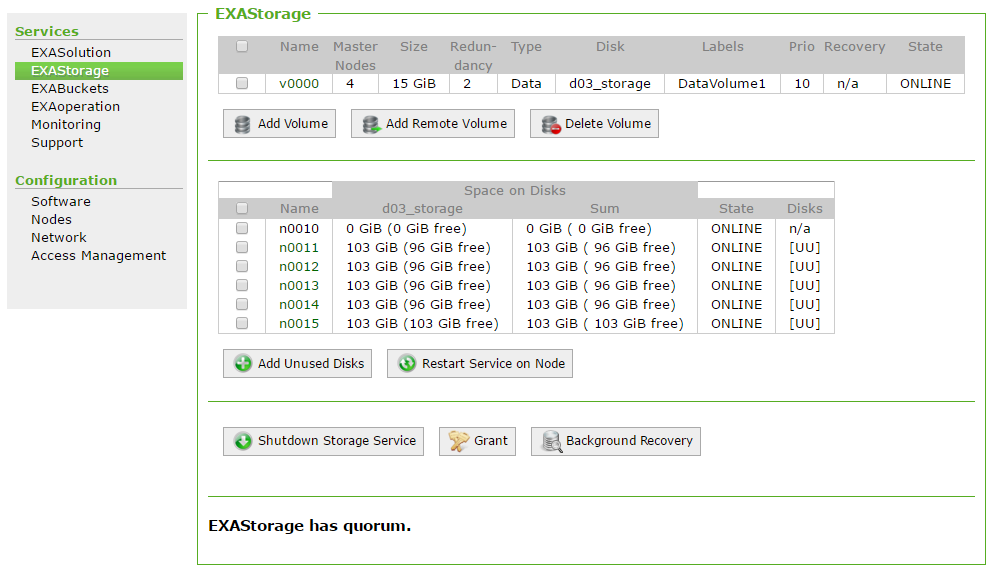
For more information on how to create archive volumes, see Create Local Archive Volume and Create Remote Archive Volume.
After you have created the data and archive volumes, you can activate the license by uploading the license through EXAoperation interface.
To activate a license, the license server must be installed and you should have a valid license file.
Follow these step to upload and activate your license file:
- Go to Configuration > Software.
- In the License tab, click Choose File...
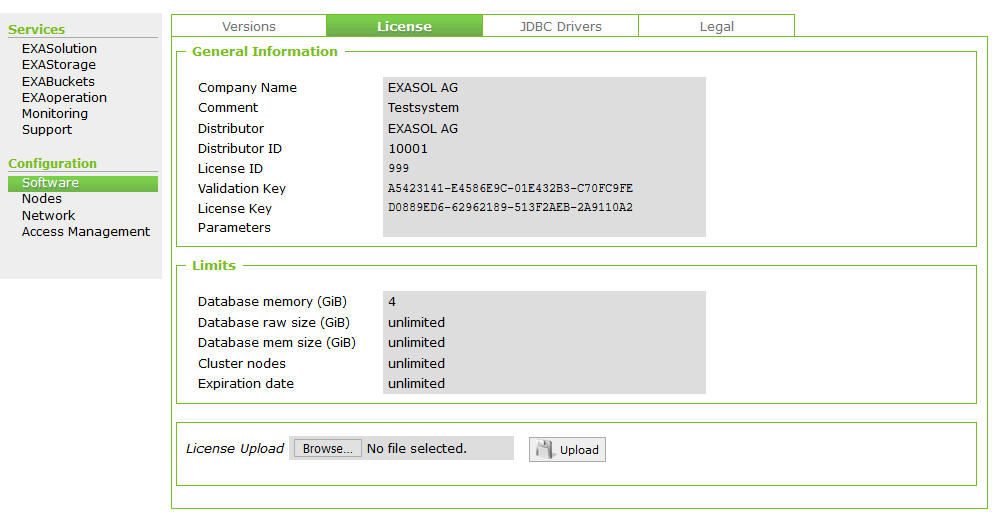
- Browse for the license file, select it and then click Upload.
- Next, to activate the license file, you need to stop and start the database. For more information, refer to the Start a database section.
Restarting the database by clicking the Restart button will not activate the license file. You need to stop and start the database.
After you have uploaded a license for Exasol, you can create a database on a data volume.
The data volume must be created before creating a database. There can be only one database per data volume.
Follow these steps to create a database:
- In EXAoperation, go to Services > EXASolution and click Add.
- Configure the following database properties.
Database Properties Description DB Name A label for the database, e.g. 'prod_db1'. Active Nodes The number of active nodes to use for the database. For example, if the system is 4+1, the number of active nodes is 4 (with one reserve node).
The value you set here must be the same as the number of nodes you set when creating the data volume (Number of Master Nodes field).
Node List Select all the nodes that the database will use, including the reserve node, and add them to the list on the right. The system recognizes the top nodes in the list based on the number of Active Nodes you specify as the active nodes. All other nodes are seen as reserve nodes.
For example, in a 4+1 setup, the number of active nodes is 4. The top 4 nodes in the Node List are active, and the remaining node is the reserve.
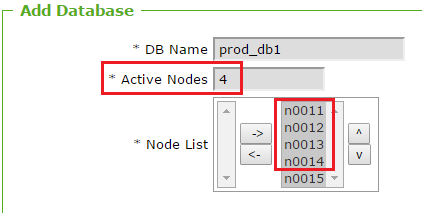
Although the number of nodes used must be the same for the data volume and database, the actual nodes used can differ. For example, if the data volume uses nodes 11,12, 13, 14 and 15, the database might use 11, 13, 14, 16 and 17.
Runtime disk Select the disk configured for 'Data' (used for database log files, etc.). Version The version of EXASolution that the database should use. This is usually the latest available version. Auditing Select this check box to save the text of all executed SQL statements (up to 2MB per statement) in the EXA_STATISTICS schema. EXAStorage Data Volume The data volume the database will run on. This is the data volume that you set up in the Create Data and Archive Volumes (Create Local Archive Volume and Create Remote Archive Volume). Restore Delay The amount of time the system will wait after a failure before restoring data to the now-active reserve node. Enter a value and a unit of time measurement ("s", "m", "h", etc.). If you enter '0', the restore will be instantaneous in the event of an outage. If you enter no value in this field, there will be no restore - the reserve node will be pushed in as per the failsafety functionality, but no data restore will occur. The recommendation is 10 minutes ("10m").
Max Volume Size (GiB) It's the maximum volume size for the database and used if there is more than one database running in the cluster. It ensures that each database has dedicated disk space available. Exasol recommends leaving this field empty if you only have one database in the cluster.
However, you need to specify this parameter if you have a disk subsystem that is used across the cluster by multiple databases. It prevents the database from using volume more than the specified value.
If the database reaches this quota, the database is shut down.
To calculate the maximum volume size, you can use the following formula.
DATA Volume Size + TEMP Volume Size = MAX Volume Size
Network Interfaces Select and add the network interfaces the database will use and add them to the list on the right. If you select no interfaces, all available network interfaces will be used. LDAP Server URLs If database users will be authenticated using LDAP servers, enter the server URLs here (separated by a comma for multiple servers). Connection Port TCP software port for the database instance. DB RAM (GiB) The amount of RAM that should be made available for the database instance. Extra DB Parameters This is an optional field to specify database parameters. For example, if you specify
-forceProtocolEncryption=1, Exasol will deny connection requests from all unsecured connections.If you want additional database parameters, contact Exasol Support.
- Click Add to add the database.

- To propagate the database to the cluster nodes, go to Services > EXASolution and click on the database instance you have just added.
- Select Create from the Actions list box and click Submit to create the database instance.
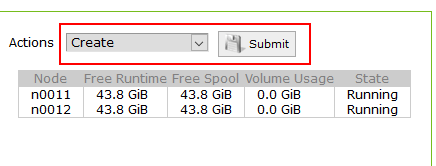
The nodes have a State of 'Selected' or 'Reserve'.
- Select Startup from the Actions list box and click Submit to start the database instance.
After you complete all the steps of installation procedure, you can create a backup schedule for your system.
This article explains how to create a schedule to automatically start backups.
Backup scheduling is based on full backups and incremental backups. For more information, see Backup essentials.
Backup schedules use the same format as cron jobs. For more information, see https://en.wikipedia.org/wiki/Cron.
Do not stop the database while a backup is in progress.
Do not add or remove nodes on the archive volume or on the data volume being backed up while a backup is in progress.
Follow these steps to create a backup schedule:
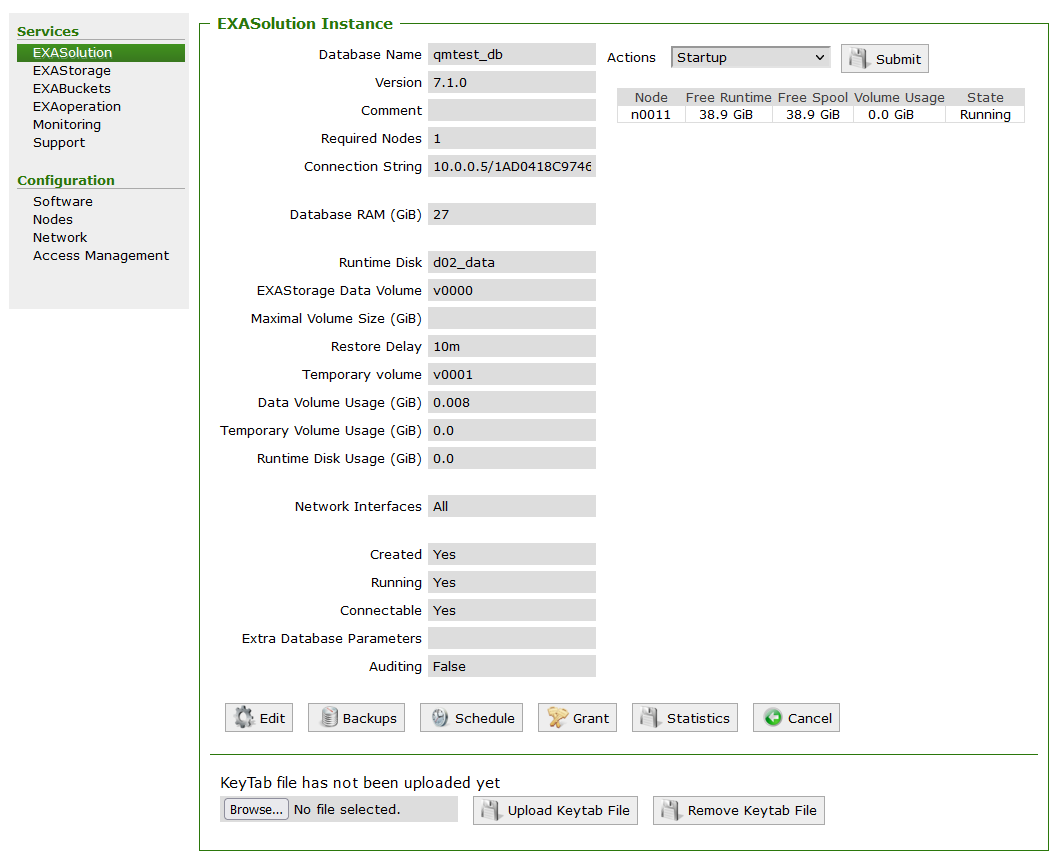
- In EXAoperation, go to Services > EXASolution and click the database instance for which you want to create the backup schedule. The Database Instance screen is displayed.
- Click Schedule to create a backup schedule. This displays the EXASolution Backup Scheduling screen.
- Set up a backup schedule using a combination of the parameters from Backup schedule settings. Separate multiple entries with commas.
- Select the Active checkbox and Add check boxes for the record you are adding, and click Apply.

Backup schedule settings
| Setting | Description | Value Range | Example |
|---|---|---|---|
| Active | Check box to indicate active backup schedule. | ||
| Minute and Hour | The time the backup must start. | 0-59 for Minute, 0-23 for Hour |
To start a backup at 11:15 PM, set Minute to "15" and Hour to "23". |
| Day | The day of the month the backup must run. | 1-31 | If a backup should run on the 15th, set Day to "15". |
| Month | The month the backup must run. | 1-12 | To run the backup every second month, set Month to "2,4,6,8,10,12". This backup will run in February, April, June, August, October, and December. |
| Weekday | The day of the week the backup must run. |
0-7:
|
To run the backup on Monday and Wednesday, set Weekday to "1,3". For Sunday, you can choose any of the two (0 or 7) options from the value range. |
| Archive | Select the archive volume the backup will be stored on. | N/A | |
| Level | The backup level, such as full backup, or incremental. |
0-9:
|
|
| Expire |
The duration of time until the backup will expire. |
N/A | To make a backup available for one week and three days, set Expire to "1w 3d". |
| Comment | A description for the backup. | N/A | "Weekly full backup." |
If a local archive volume runs out of free space, expired backups will be automatically deleted. Expired remote archive volumes will not be deleted by this function.
Example: Weekly backup with daily incremental backups
The following is an example of creating a weekly backup with daily incremental backups. The following is a suggestion for a backup schedule:
- Full Backup on Sunday at 00:00 (level 0), with a retention time of 1w 3.
- Incremental Backups every day of the week at 00:00 (level 1), with a retention time of 3d.
In this backup setup, a full backup (level 0) is done on Sunday at midnight. The backups on each week night (level 1) back up all changes that occur since the full backup. The backups are stored in an archive volume within the cluster.
Level 0 backup settings
- Active: Yes
- Minute: 0
- Hour: 0
- Day: Every Day (set to *)
- Month: Every Month (set to *)
- Weekday: 0 or 7 (Sunday)
- Archive: Select an archive volume.
- Level: 0 (Full Backup)
- Expire: 1w3d or 10d
- Comment: optional
- Add: Yes

Level 1 Backup settings
- Active: Yes
- Minute: 0
- Hour: 0
- Day: Every Day (set to *)
- Month: Every Month (set to *)
- Weekday: 1,2,3,4,5,6 (Monday, Tuesday, Wednesday, Thursday, Friday, Saturday)
- Archive: Select an archive volume.
- Level: 1 (Incremental Backup)
- Expire: 3d
- Comment: optional
- Add: Yes

Completed schedule
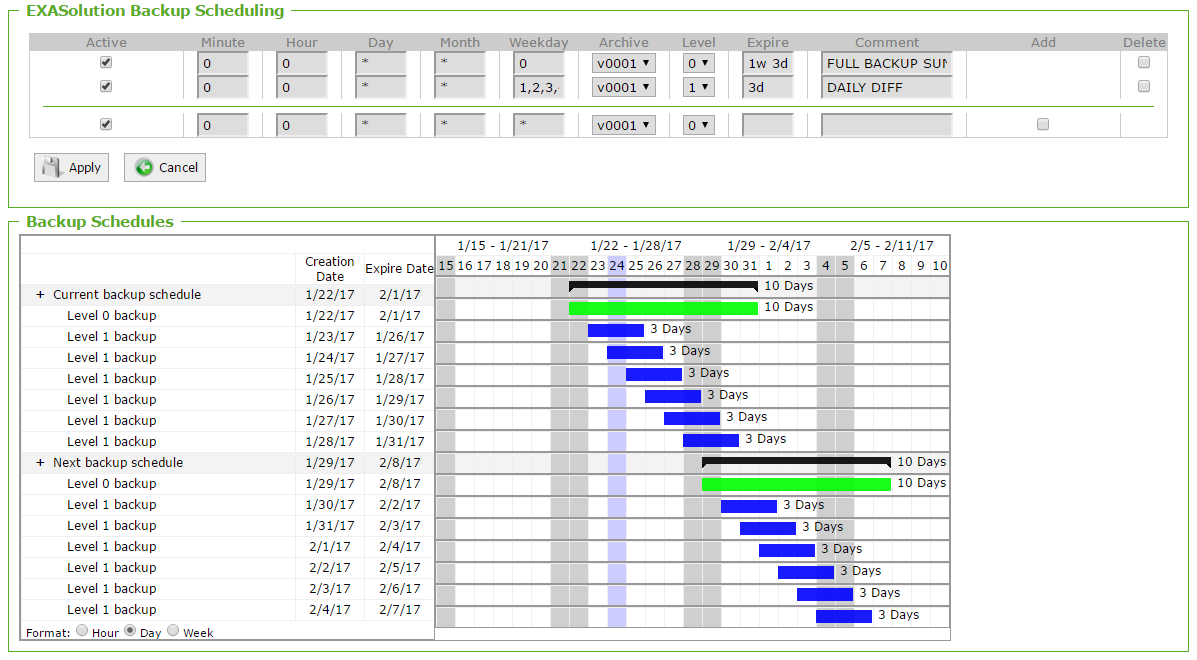
For more information about backup schedules, see Create backup schedule.
