Configure Node Disk Layout
Disk layout is not
The disk layout defines how the data is stored on the physical disk devices. When a new node is created, it is assigned the cluster's default disk layout. It is possible to configure the disk layout for each specific node, if it differs from the default layout.
When installing disk devices, it is recommended to combine two physical disks in RAID 1 to prevent data loss.
Disk Layout
When a node is created, it is assigned either the default disk layout, or the user specifies a node-specific disk layout. In Exasol, the following four partitions are required:
| Partition | Description |
|---|---|
| OS partition (e.g. 'd00_os') | The Exasol cluster operating system is installed on this partition. It is an ext4 filesystem with journaling, and is AES 256 encrypted. It should be assigned at least 50 GiB of space. |
| Swap partition (e.g. 'd01_swap') | Used for swap data. It should be assigned at least 4 GiB of space. |
| Data partition (e.g. 'd02_data') | Used for database logs and coredumps. It is an ext4 filesystem with journaling. It should be assigned at least 50 GiB of space. |
| EXAStorage partition (e.g. 'd03_storage') | Used for persistent database data, temporary database data, and archive data. It runs on one or more physical disks. |
You set the partitions up by assigning storage devices to each partition. For physical clusters, there are two main strategies to use:
- RAID mirror with a software RAID – the data for each partition is stored across all storage devices.
- Hard drive with a dedicated OS disk – the OS, Swap and Data partitions are stored on a dedicated storage device, while the Storage partition is stored across the remaining storage devices.
RAID Mirror With Software RAID
All storage devices are the same size, and are used by all partitions (OS, Data, Swap and Storage). You configure the node disks as follows:
- Add all storage devices to the OS, Swap, Data and Storage partitions.
- OS, Swap and Data have a disk RAID of 'RAID 0'.
- Storage has a disk RAID of 'None'.
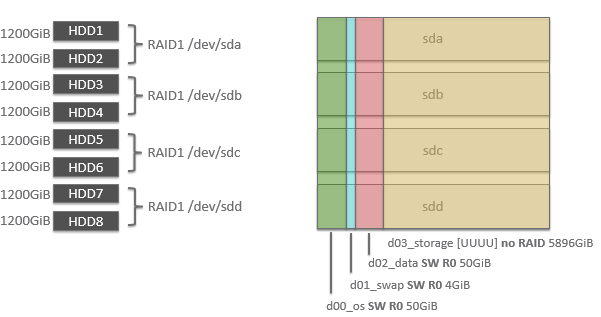
Example:
In this example, there is a total of 4 disks (8 storage devices with a RAID 1 configuration). The OS (50 GiB), Swap (4 GiB), Data (50 GiB) and Storage partitions are shared across all disks. The space available for the Storage partition is the remaining disk space on the storage devices.
Hard Drive With Dedicated OS Disk
The OS, Swap and Data partitions share a dedicated disk, which is usually smaller in size than the disks intended for the Storage. You configure the node disks as follows:
- Add the dedicated storage device to the OS, Swap and Data partitions.
- Add all other storage devices to the Storage partition.
- OS, Swap and Data use the dedicated OS disk .
- Storage has a disk RAID of 'None'.
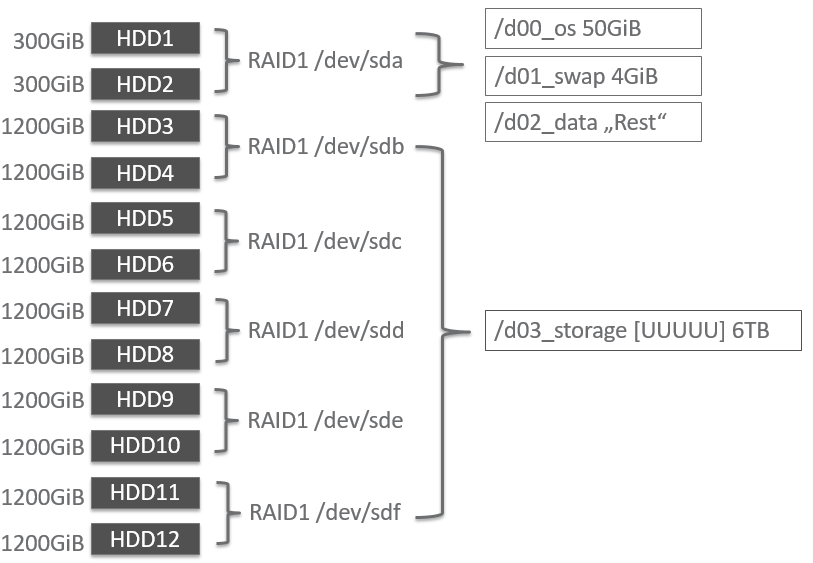
Example:
In this example, there is a total of 6 disks (12 storage devices with a RAID 1 configuration). The OS, Swap and Data partitions are assigned to a single disk (/dev/sda), which is also smaller in size than the other disks. The Storage partition is assigned to the remaining disks.
Virtualized Environment
There is a dedicated virtual disk for the OS, Swap and Data partitions, and at least one disk for storage. You configure the node disks as follows:
- Add the dedicated storage device to the OS, Swap and Data partitions.
- Add all other storage devices to the Storage partition.
- OS, Swap and Data use the dedicated OS disk
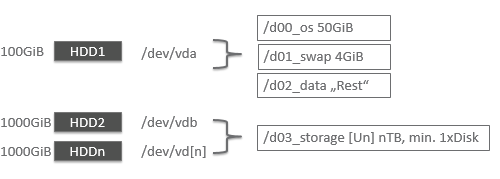
Example:
The following is an example image of disk layout on virtualized environments.
Configure Node Disk Layout
You can follow the below steps to configure a node disk layout:
- In EXAoperation, go to Configuration > Nodes and click on the node link.
- The Node Information screen is displayed.
- Click Disks. The Disk Information screen is displayed.
- Click Edit to edit the disk. Configure the following for each partition:
- Disk devices: The physical disk(s) that the storage disk runs on. Click Add for each device to add to the partition.
- Disk RAID: Redundancy of the disk.
- Disk encryption: Select the encryption to be used for the partition.
- Disk Label: Name for the partition as it should appear in screens across EXAoperations.
- Size of disk: The maximum space in GiB available to the partition.
The way you configure the disks depends on your hardware setup (refer to Disk Layout). You have the following two options:
RAID mirror with software RAID
Partition Disk device to assign Disk RAID Disk size OS All RAID 0 50GiB Swap All RAID 0 4GiB Data All RAID 0 50 GiB Storage All Select 'None' Leave blank Hard drive with dedicated OS disk
Partition Disk device to assign Disk RAID Disk size OS Dedicated HDD Select 'None' 50GiB Swap Dedicated HDD Select 'None' 4GiB Data Dedicated HDD Select 'None' Leave blank Storage Dedicated HDD Select 'None' Leave blank - Click Apply to save your changes.
Configure Default Disk Layout
There are several ways to configure disk devices based on the disk types. The following are some of the commonly used ways you can configure disk devices:
/dev/sd[a-z]+- Identifiers for SCSI devices/dev/cciss/c[0-9]d[0-9]– Identifiers for devices connected to Hp controller/dev/mapper/iscsi[a-z0-9]+- iSCSI devices with WWN access
However, in certain scenarios when you restart the database or you perform an update, you may run into disk device configuration problems for the node. This would require you to reconfigure the disk devices.
In order to eliminate the need to reconfigure disk devices, Exasol introduces another way to identify disk devices, which is as follows:
/dev/exad[0-9]+
By using this, the devices are sorted according to the PCI-ID’s and remain in the same order independent of the controller initialization.
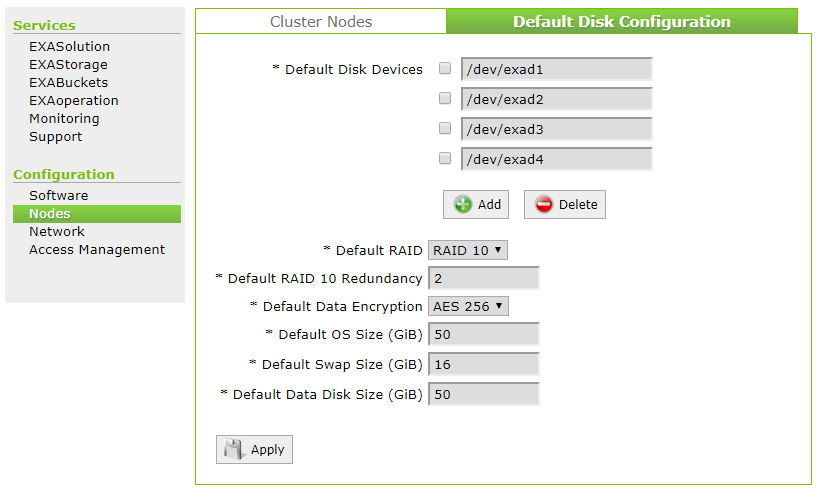
Follow the steps below to configure the default disk layout:
- Go to Configuration > Nodes and click the Default Disk Configuration tab.
- Configure the following:
- Default Disk Devices: The physical disk(s) to use for the disk configuration by default. Click Add to add a new device.
- Default RAID: The RAID setup of the disk devices.
- Default RAID 10 Redundancy: Only necessary if RAID 10 is selected as the Default RAID.
- Default Disk Encryption: Select the encryption to be used for the partition.
- Default OS Size (GiB): Default size of the OS partition.
- Default Swap Size (GiB): Default size of the swap partition.
- Default Data Disk Size (GiB): Default size of the data partition.
The way you configure the disks depends on your hardware setup. There are two common options for the disk layout of physical clusters:
RAID Mirror with Software RAID
Partition Disk Device to Assign Disk RAID Size of Disk OS All RAID 0 50GiB Swap All RAID 0 4GiB Data All RAID 0 50 GiB Storage All Select 'None' Leave blank Hard Drive With Dedicated OS Disk
Partition Disk Device to Assign Disk RAID Size of Disk OS Dedicated HDD Select 'None' 50GiB Swap Dedicated HDD Select 'None' 4GiB Data Dedicated HDD Select 'None' Leave blank Storage Dedicated HDD Select 'None' Leave blank - Click Apply to save your changes.
Update Default Disk Layout
You can update the default disk device layout to use /dev/exad[0-9]+ by following the steps below. This would require a downtime period and hence need to be planned ahead.
- Shutdown the database(s). In EXAoperation, go to Services > EXASolution and select the database instances you need to shutdown and click Shutdown.
- Next, shutdown the storage services. Navigate to EXAStorage and then click Shutdown Storage Service to stop the storage services.
- Shutdown all nodes. Navigated to Configuration > Nodes, select all the data nodes and then select Shutdown from the Actions ... drop down list. Click Execute.
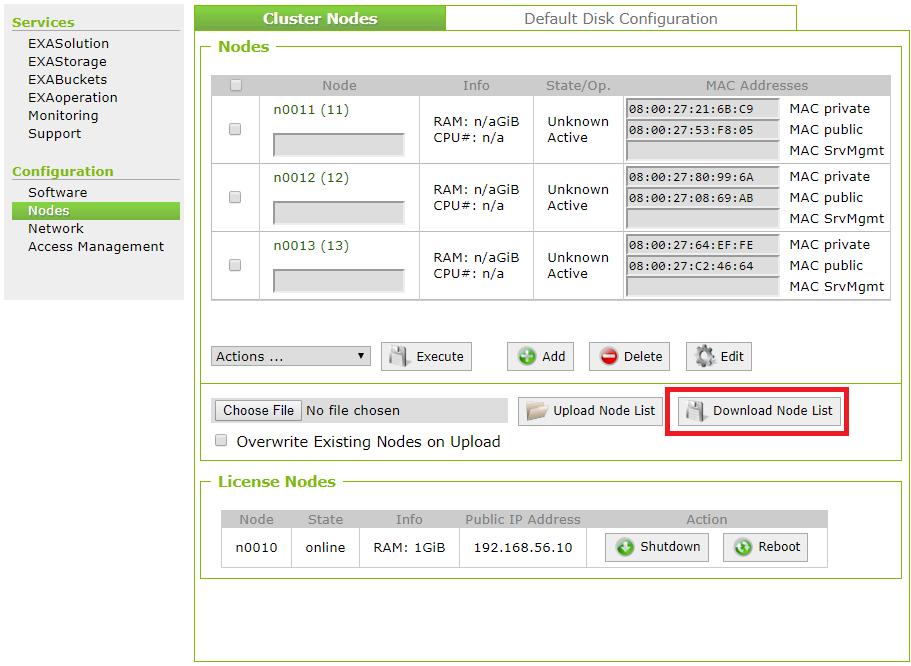
- Download the nodes.xml file. In the Cluster Nodes screen, click Download Node List.
- Edit the device names in the nodes.xml file to
/dev/exad1and so on. - Upload the edited nodes.xml file by clicking Upload Node List in the Cluster Nodes screen.
- Restart the nodes. Depending on your environment, the steps to start up the data nodes can be different. For more information, refer to Start Nodes.
- Start the storage services. Go to Services > EXAStorage and click Startup Storage Service.
- Next, start the database(s). Go to Services > EXASolution and select the database and click Start.
