SDDC: Installation
Learn how to install and configure an SDDC solution with Exasol.
The documentation in this section is intended for advanced users who are already familiar with how to install and administer Exasol databases using ConfD and Exasol Deployment Tool (c4).
Incorrect configuration and administration of an SDDC cluster presents a high risk of data loss. When you install and administer an SDDC solution with Exasol, observe extreme caution and follow the provided instructions precisely.
If you have any doubts when performing a task described in this documentation, contact Support for guidance.
Introduction
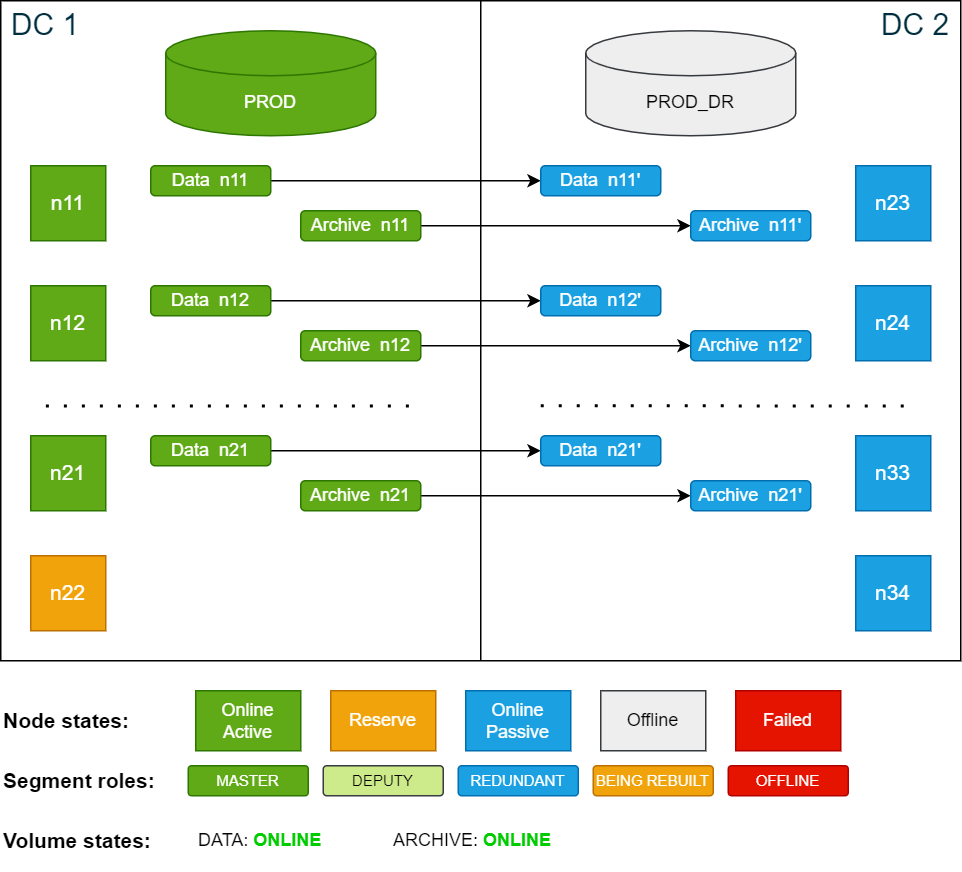
The following example describes how to install an Exasol cluster that stretches over two data centers, using 11 active nodes + 1 reserve node in each data center. The cluster configuration in this example is also referenced in the other articles in this section.
Cluster configuration overview:
-
Two data centers: DC 1 (active) and DC 2 (passive).
-
Each data center has 11 active nodes + 1 reserve node (24 nodes total).
-
A single data volume is configured with the nodes from DC 1 defined as master nodes, while the nodes in DC 2 are defined to hold the redundant copies. The data volume is created with redundancy 2.
-
A single archive volume is configured with the same redundancy as the data volume.
-
The active database PROD has nodes n11 - n21 as active nodes and n22 as reserve node.
-
The passive database PROD_DR uses the same data volume as PROD, but with n23 to n33 as active nodes and n34 as reserve node.
-
Both databases use the default port (8563).
For details about network requirements and bandwidth planning for the interconnect network, see SDDC: Overview.
For simplicity, the illustrations here and in SDDC: Example failure scenarios show only 4 nodes in each data center.
Cluster overview when fully operational:
Installation procedure
Only the steps that are specific for an SDDC setup are explained in detail in this example. For more information about the full installation procedure, see Install Exasol - step by step.
Exasol Admin UI is not used in the database administration steps in this procedure, since the UI is not available in all versions of Exasol. We recommend that you to perform all administration tasks using the command-line tools as described in the examples.
-
Prepare the hosts (rootless install)
Make sure that the hosts must meet the necessary hardware and operating system requirements, and prepare them according to the instructions for a rootless installation (running with a non-root Exasol user).
For more details, see System requirements and Rootless deployment.
-
Create the configuration
Create the configuration file as if you were deploying a normal Exasol database, with the following differences:
-
The configuration file must include the IP addresses of all nodes from both data centers.
-
Add the parameter
CCC_PLAY_WITH_DB=falseto the configuration. This is required to prevent c4 from creating a default database and data volume during installation.
For more details about creating a configuration file, see Configure the deployment.
-
-
Start the deployment
Copy./c4 host play -i configThe deployment will be created without a database but with a default data volume, which must be deleted.
-
Delete the default data volume
Delete the default data volume using the ConfD command st_volume_delete:Copyconfd_client st_volume_delete vname: DataVolume1 -
Create a data volume that includes all storage nodes from both sites, excluding the reserve nodes.
To create the volume, use the ConfD command st_volume_create with the following parameters:
Parameter Description nameA unique name for the data volume. In this example we use the name data_vol.diskThe name of the disk device to be used for the volume. In this example we use the name disk1.typedatasizeThe initial data volume size (with unit) as a string. For example:
100 GiB.The data volume will automatically grow as the database grows, as long as there is enough disk space in the cluster to accomodate it.
nodesAll data nodes (excluding reserve nodes) in DC 1 and DC 2, in that order, as a comma-separated list. For example:
'[11,12,13,14,15,16,17,18,19,20,21,23,24,25,26,27,28,29,30,31,32,33]'num_active_nodesThe number of active nodes (excluding reserve nodes) in DC 1. In this example,
11.redundancy2sharedfalseCopyconfd_client st_volume_create name: data_vol disk: disk1 type: data size: '100 GiB' nodes: '[11,12,13,14,15,16,17,18,19,20,21,23,24,25,26,27,28,29,30,31,32,33]' redundancy: 2 num_master_nodes: 11 shared: false -
Create a new archive volume (optional)
Create an archive volume using the ConfD command st_volume_create. Use the exact same parameter values as for the data volume, with the following exceptions:
Parameter Description nameA unique name for the archive volume. In this example we use the name arc_vol.typearchivesizeThe archive volume size (with unit), in string format.
An archive volume can only be expanded manually and cannot be decreased. In the following example we use 100 GiB as the archive volume size, but for most production workloads the size should be much larger.
To learn more about how to calculate the required volume size, see Sizing guidelines.
Copyconfd_client st_volume_create name: arc_vol disk: disk1 type: archive size: '100 GiB' nodes: '[11,12,13,14,15,16,17,18,19,20,21,23,24,25,26,27,28,29,30,31,32,33]' redundancy: 2 num_master_nodes: 11 -
Create a temporary data volume
This volume is only needed for creating the standby database and will be deleted later.
Create the volume with redundancy 1 and only on the active nodes (excluding reserve nodes) in DC 2.
Copyconfd_client st_volume_create name: DataVolumeTemporary disk: disk1 type: data size: '100 GiB' nodes: '[23,24,25,26,27,28,29,30,31,32,33]' redundancy: 1 num_master_nodes: 11 -
Create the active database
Create the active database PROD using the ConfD command db_create with the following parameters:
Parameter Description db_nameA unique name for the active database. In this example we use the name PROD.versionThe database version, for example 2025.2.0data_volume_nameThe name of the data volume that you created in the previous step, Create a new data volume
mem_sizeThe amount of memory to allocate to the database (DB RAM) as a string. For example,
‘100 GiB’If you specify a size larger than the available physical memory, it will automatically be reduced.
To learn how to calculate the amount of DB RAM, see Sizing guidelines.
nodesAll nodes in DC 1 as a comma-separated list.
num_active_nodesThe value set in
num_master_nodesfor the data volume.auto_startfalseSetting this parameter to
falsewill require the database to be started manually after starting the services. This protects the database against unwanted startups during disaster scenarios. As a result, you must also manually start the database after a database update.Copyconfd_client db_create db_name: PROD version: 2025.2.0 data_volume_name: data_vol mem_size: '100 GiB' port: 8563 nodes: '[11,12,13,14,15,16,17,18,19,20,21,22]' num_active_nodes: 11 auto_start: false -
Create the standby database
Create the standby database PROD_DR using the ConfD command db_create. Use the exact same parameter values as for the active database, with the following exceptions:
Parameter Description db_nameA unique name for the standby database. In this example we use the name PROD_DR.data_volume_nameThe name of the temporary data volume that you created in the previous step, Create a temporary data volume
nodesAll nodes in DC 2 as a comma-separated list.
num_active_nodesThe value set in
num_master_nodesfor the temporary data volume.Copyconfd_client db_create db_name: PROD_DR version: 2025.2.0 data_volume_name: DataVolumeTemporary mem_size: '100 GiB' port: 8563 nodes: '[23,24,25,26,27,28,29,30,31,32,33,34]' num_active_nodes: 11 auto_start: false -
Install database certificates (optional)
If TLS authentication should be used for the cluster, install the certificates on all nodes using the ConfD command cert_update. For more details, see Upload TLS certificate.
Copyconfd_client cert_update -
Start the active database
Start the active database PROD using the ConfD command db_start.
Copyconfd_client db_start db_name: PROD -
Set
create_new_db=falsein the standby databaseUse the ConfD command db_configure to set the
create_new_dbparameter tofalse.If
create_new_dbistrue, all data and metadata are deleted in the standby database will be deleted the next time it starts. Setting the parameter explicitly tofalsewill prevent this.Copyconfd_client db_configure db_name: PROD_DR create_new_db: false -
Start and stop the standby database
Start the standby database PROD_DR to initialize it, then stop it again.
Copyconfd_client db_start db_name: PROD_DR
confd_client db_stop db_name: PROD_DR -
Change the data volume of the standby database
Use the ConfD command db_configure to configure the standby database to use the same data volume as the active database.
Copyconfd_client db_configure db_name: PROD_DR data_volume_name: data_vol -
Remove the temporary database volume
Use the ConfD command st_volume_delete to remove the temporary database volume .
Copyconfd_client st_volume_delete vname: DataVolumeTemporary -
Create backup schedules
Use the ConfD command db_backup_add_schedule to create backup schedules for the active database and standby database.
-
Both databases will use the same archive volume.
-
The schedule of the standby database is disabled, since the backup cannot run if the database is offline.
Copyconfd_client db_backup_add_schedule db_name: PROD backup_name: SundayFullBackup backup_volume_name: arc_vol enabled: true level: 0 expire: '1w 3d' hour: 0 day: '*' month: '*' weekday: 0
confd_client db_backup_add_schedule db_name: PROD_DR backup_name: SundayFullBackup backup_volume_name: arc_vol enabled: false level: 0 expire: '1w 3d' hour: 0 day: '*' month: '*' weekday: 0 -