Looker
This article explains how to connect Looker to an Exasol database.
Exasol takes no responsibility for changes in functionality or terms of use for third-party tools. For more details about the compatibility and use of these tools with Exasol, refer to the respective software vendor’s website.
Introduction
Looker is a web-based business intelligence software and big data analytics platform that can connect to an Exasol database using the Exasol JDBC driver.
This article describes how to configure a connection from Looker to an Exasol database. For more information about how to use Looker, refer to the Looker Documentation.
Prerequisites
-
Your Exasol SaaS database must be running.
-
The IP address of the host where the tool is running must be in the allowed IP address list.
To learn more about how to allow traffic to your database, see Network Security.
-
The Exasol JDBC driver must be installed. To learn more, see JDBC Driver.
Get the connection details
-
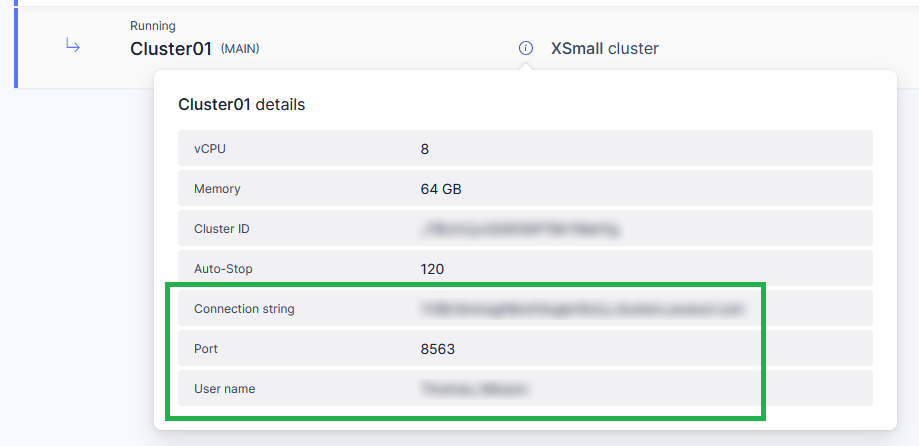
On the Databases page in the Exasol SaaS web console, click on the info button on the cluster.
-
Copy the connection string, port, and username from the cluster details window. You will need this information when you configure the connection in the client.
-
If you do not already have a personal access token (PAT), follow the instructions in Personal access token to create a new token. The token and the username will be used by the client to authenticate to Exasol.
The token is only shown once and will disappear when you close or refresh the page. Make sure that you copy the token, since it cannot be retrieved if you lose it. In that case you must create a new token.
Create a database user
-
In the Exasol database, create a designated user for Looker and grant the user the permission to create sessions, and the appropriate permissions on the tables or schema that Looker will use.
Example:
CopyCREATE USER LOOKER IDENTIFIED BY "<password>";
GRANT CREATE SESSION TO LOOKER;
GRANT SELECT ON <tables> TO LOOKER;
// or
GRANT ALL PRIVILEGES ON SCHEMA <MY_SCHEMA> TO LOOKER; -
A persistent derived table (PDT) is a derived table that is written to a scratch schema on your database and regenerated by a scheduled cron job. If you are planning to use PDTs in the Looker connection, create a designated schema for this purpose and grant all privileges on this schema to the Looker user.
Example:
CopyCREATE SCHEMA LOOKER_SCRATCH;
ALTER SCHEMA LOOKER_SCRATCH CHANGE OWNER LOOKER;To learn more about persistent derived tables (PDTs), refer to the Looker documentation.
Connect Looker to Exasol
In Looker, create a new database connection with the following properties:
-
Dialect: Exasol
-
Host:Port: The connection string and port that you copied in Get the connection details
-
Database: The name of the Exasol database.
-
Username: The username for the Looker user in the Exasol database.
-
Password: Your personal access token.
-
Schema: The schema that Looker will use in your database.
-
Persistent Derived Tables: Enables persistent derived tables (PDTs).
-
Temp Database: The schema that Looker will use for persistent derived tables (PDTs). This parameter is required if the PDT option is enabled.
-
Additional Params: You can include additional JDBC parameters for your queries here if needed.
-
PDT and Datagroup Maintenance Schedule: You can provide a cron expression that tells Looker how often it should check for datagroups and persistent derived tables (PDTs) to be regenerated or dropped. The default value is
*/5****(check every 5 minutes). -
SSL: Choose whether or not you want to use SSL encryption to protect data.
-
Max Connections: The maximum number of connections that Looker can establish with your database.
-
Connection Pool Timeout: The time in seconds that a request will wait before the connection times out.
-
SQL Runner Precache: If enabled, all table information is pre-loaded when you select a connection and schema. This allows table columns to be displayed faster when you click on a table name.
For more details about the connection settings and how to test and troubleshoot the connection, refer to Connect Looker to Exasol in the Looker documentation.

