Purpose
Use the IMPORT command to transfer data from external data sources into Exasol.
You can specify a table that the imported data should be inserted into. If no table is specified, the data is returned as a result set.
Prerequisites
- You must have the system privileges
IMPORTandINSERT. - When using a connection, you must have the system privilege
USE ANY CONNECTIONor the connection must be granted either to the user or to one of the user roles by the GRANT statement. For more information, see CREATE CONNECTION. - When using an error table, you must have the necessary privileges to write or insert data.
- On the source system, you must have privileges to read the table contents or the files.
Syntax
import::=


import_columns::=

dbms_src::=


file_src::=


connection_def::=

cloud_connection_def::=

user_identification:=

cert_verification:=

blobstorage_authentication::=

csv_cols::=

fbv_cols::=

file_opts::=

script_src::=

error_clause::=

reject_clause::=

error_dst::=

parquet_metadata_specification::=
session_token::=

Usage notes
-
Importing from a CSV file is the fastest way to import data into Exasol.
-
When importing from JDBC or CSV sources, decimals are truncated if the target data type has less precision than the source data type.
-
In Exasol SaaS you cannot import from a local CSV file when using Worksheets.
-
Lines starting with
#(hash) in CSV or FBV files will be ignored. See also CSV and FBV file formats and details. -
The IMPORT statement runs in parallel on multiple nodes, which means that row packets arrive in no particular order. Ordering is therefore not guaranteed when using IMPORT, even if the source query contains an ORDER BY clause.
-
Import statements can be used within SELECT queries. See also the examples in IMPORT.
-
The latest version of Exasol supports importing Parquet files stored on cloud storage services, on remote file servers, and on local systems. For more details about supported features when importing Parquet files in different versions of Exasol, see Importing Parquet files.
-
Exasol supports the Apache Iceberg open table format in Parquet files.
For more information about ETL processes, see ETL in Exasol.
You can monitor the data transfer operation by opening a second connection and viewing the progress in the column ACTIVITY of the system table EXA_USER_SESSIONS.
Elements and parameters in IMPORT
-
Instead of importing data into a table by specifying a table name, you can specify a list of columns to perform a temporary import. The data imported into Exasol is then not persistent, but is returned as a result set.
To specify the output columns to be the same as the columns of an existing table in the Exasol database, use the
LIKEclause.
-
Defines the database source whose connection data is specified in
connection_def.You can choose among an Exasol connection (
EXA), a native connection to an Oracle database (ORA), or a JDBC connection to any database (JDBC).The source data can either be a database table as identifier (for example,
MY_SCHEMA.MY_TABLE) or a database statement as a string (for example,'SELECT * FROM DUAL'). When using a database statement as a string, the expression is executed on the source database, for example, a SQL query or a procedure call.When using the
TABLEsyntax (as opposed toSTATEMENT), the table name identifier is treated similarly to Exasol tables. If the remote system expects case-sensitive syntax, you must use quote marks to delimit the table names.Parallel EXA to EXA connections
To enable parallelization in IMPORT/EXPORT operations using an Exasol connection (EXA), you can define multiple hosts in the connection string. Parallel connections are then established using the existing database port. No additional ports need to be opened by the database.
The connection string supports OpenID authentication and the following ODBC parameters:
SSLCertificate,AuthMethod,HostTimeOut,LoginTimeout,Encryption,LogMode,EXALogFile, andFingerprint. Other parameters are not supported.You must include all hosts in the connection string to enable parallelization.
To achieve optimal parallelization:
-
If you import from an Exasol database using
FROM EXA, importing is always parallelized. This means that for Exasol, loading tables directly is significantly faster than using theSTATEMENToption. -
If you import data from Oracle sources using
FROM ORAwith theTABLEoption, partitioned tables will be loaded in parallel. -
Specifying multiple
STATEMENTclauses will allow them to be executed in parallel, which may improve performance compared to loading all data as a singleSTATEMENT. You can only specify multiple statements for JDBC and Oracle sources.
-
-
Specifies the data file source.
-
The source file can be in CSV, FBV, or Parquet format. CSV and FBV files must comply to the file format specifications described in CSV and FBV file formats and details. For Parquet files, see Importing Parquet files for more information.
-
File names may only consist of
ASCIIcharacters. Using a BOM (byte order mark) is not supported. -
Compressed files are recognized by their file extension. Supported extensions are .zip, .gz (gzip) and .bz2 (bzip2).
-
When
System.inis specified as filename, data is read from the standard input stream.
Remote files
You can import data from files that are stored on remote services.
FTP, FTPS, SFTP, HTTP, and HTTPS servers are supported if connection data is defined using connection_def.
-
For FTP and FTPS servers, only passive mode is supported.
-
For HTTP and HTTPS servers, only basic authentication is supported.
-
For HTTP and HTTPS connections, HTTP query parameters can be specified by appending them to the file name. For example:
FILE 'file.csv?op=OPEN&user.name=user' -
In case of URLs starting with
ftps://
, Exasol uses the implicit encryption. -
In case of URLs starting with
ftp://
, Exasol encrypts the user name and password (explicit encryption) if the server supports this. If the server requires encryption, the whole data transfer is done encrypted. -
For encrypted connections, TLS certificate verification is disabled by default. You can enable or disable certificate verification in the following ways:
-
Set the database parameter
-etlCheckCertsDefault=1 -
Enable or disable certificate verification directly in the SQL statement:
VERIFY CERTIFICATE: Enables certificate verification.IGNORE CERTIFICATE: Disables certificate verification.PUBLIC KEY 'sha256//*******': Specifies the public key for certificate verification.
-
-
If you specify a folder, the result contains one row for each file in the given folder, with one column containing the filename.
Local files
You can import local files from your client system using EXAplus and the Exasol JDBC driver. When importing local files, the JDBC driver opens an internal connection to the cluster and provides either an HTTP or HTTPS server, depending on the
SECUREoption.-
If the
SECUREkeyword is used, the server uses the HTTPS protocol and the data is transferred encrypted. -
If the
SECUREkeyword is omitted, the server uses HTTP and the connection will be unencrypted.
The default option for the internal connection is determined by the main connection:
-
If the main connection is encrypted, the local import operation is also encrypted by default.
-
If the main connection is not encrypted, the local import operation is also not encrypted by default. In this case, you can override the driver behavior by using the
SECUREkeyword to enforce a secure connection.
When using the SECURE option, data transfer performance will be reduced.
Loading data from local files is only supported when using EXAplus and the Exasol JDBC driver. It is not supported with prepared statements or within database scripts.
If you want to process a local file with an explicit program you can use the Java command-line tool EXAjload, which is included in the JDBC driver package. For more information about EXAjload, run the
exajloadcommand in a terminal without parameters.For local Parquet imports you must specify configuration parameters with the
CONFIGclause. For example:CopyIMPORT INTO my_schema.my_table
FROM LOCAL PARQUET
CONFIG 'MaxConnections=2;MaxBatchFetchSize=1;MaxConcurrentReads=1'
FILE '/home/user/test.parquet'
;MaxConcurrentReadsmust be1for local Parquet imports. Other values may cause connection or read failures.For more information, see Load data from local or remote files.
Cloud storage
The connection to the cloud storage service is defined in cloud_connection_def.
You can import CSV and FBV files from Amazon S3, Azure Blob Storage, and Google Cloud Storage.
Parquet files can be imported from Amazon S3 buckets on AWS, from S3-compatible cloud storage, and from Azure Blob Storage. For more details and examples, see Importing Parquet files.
To learn more about all options when importing files from cloud storage, see Load data using IMPORT.
-
-
Defines the connection to an external database or file server. The connection can be specified in a connection string, which may include authentication information.
For regular ETL jobs we recommend that you create a connection object to encapsulate the authentication details. For more information, see CREATE CONNECTION.
The declaration of
USERandIDENTIFIED BYwithin the command are optional. If they are omitted, the authentication information in the connection string or the connection object are used.Kerberos SSO
For JDBC connections, it is possible to use Kerberos authentication by specifying specific data in the
IDENTIFIED BYfield. This data consists of a key that indicates that Kerberos authentication should be used (ExaAuthType=Kerberos), a base64 encoded configuration file, and a base64 encoded keytab file containing the credentials for the principal.Example:
CopyIMPORT INTO table1
FROM JDBC AT '<JDBC_URL>'
USER '<kerberos_principal>'
IDENTIFIED BY 'ExaAuthType=Kerberos;<base64_krb_conf>;<base64_keytab>' TABLE table2;
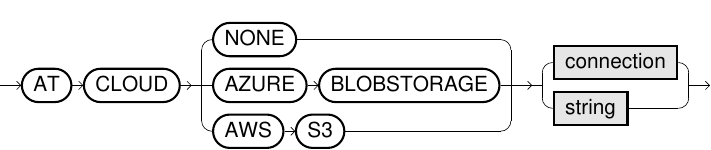
-
Defines a connection to a cloud storage service.
The connection can be specified in a connection string, which may include authentication information. The format of the connection string can be different depending on the cloud service.
To prevent connection details from being exposed in logs and audit tables, we recommend that you always create a connection object using CREATE CONNECTION and authenticate using the saved connection instead of providing the details openly in the IMPORT/EXPORTstatements.
Example:
CopyCLOUD AZURE BLOBSTORAGE 'DefaultEndpointsProtocol=https;EndpointSuffix=core.windows.net'
USER '<accountName>' IDENTIFIED BY '<key>';For more details about how to connect to cloud services, see Load data using IMPORT.
-
Defines how the column data is written to a CSV file. For more information, see CSV DATA Format.
Option Description col_nrDefines the column number. The first column is
1.You can also define a column range, for example,
5..8for columns 5, 6, 7, 8. Column numbers must be in ascending order.FORMATOptional format definition for numbers or datetime values. The default is the session format.
For more information, see Numeric format models and Date/time format models.
Example:
In the following example, four columns are loaded from the CSV file, with the fourth column using a specified date format.
(1..3,4 FORMAT='DD-MM-YYYY')
For more complete examples of how to use
FORMAT, see Examples.
-
Defines which columns are read from an FBV file, and how they are interpreted. For more information, see Fixblock Data Format.
The following elements can be specified in an FBV file:
Element Description SIZEDefines the number of bytes of the column. The size must always be specified.
STARTStart byte of the column. It starts with zero. The STARTvalues must be in ascending order.FORMATOptional format definition for numbers or date time values. Default: session format.
For more information, see Numeric format models and Date/time format models.
ALIGNAlignment of the column.
Allowed values are
LEFTorRIGHT. The default value isLEFT.PADDINGPadding characters for columns.
By default, a space character is used. You can also specify an ASCII character, either in plain text (
'+'), as a hexadecimal value ('0x09'), or as an abbreviation ('NUL','TAB','LF','CR','ESC').Example:
In this example, four columns are imported from an FBV file. The first column is padded with “x” characters. After the first 12 bytes there is a gap, and the fourth column has the date format specified for the FBV file.
Copy(SIZE=8 PADDING='x' ALIGN=RIGHT,
SIZE=4,
START=17 SIZE=8,
SIZE=32 FORMAT='DD-MM-YYYY')
-
Option Description COLUMN DELIMITERDefines the field delimiter for CSV files.
By default, the double quote character
"is used. You can specify any string as a delimiter, either as plain text ('"'), as a hexadecimal value ('0x09'), or as an ASCII abbreviation ('NUL','TAB','LF','CR','ESC').A plain text value is limited to 10 characters, which are automatically converted to the encoding set for the file with the
ENCODINGoption.A hexadecimal value is limited to 10 bytes (not characters) and will not be converted.
If you do not want to use any field delimiter, define an empty string (
'').COLUMN SEPARATORDefines the field separator for CSV files.
By default, comma is used. You can specify any string as a separator, either as plain text (
','), as a hexadecimal value ('0x09'), or as an ASCII abbreviation ('NUL','TAB','LF','CR','ESC').From a performance perspective, using a single-byte column separator is better than a multi-byte one.
A plain text value is limited to 10 characters, which are automatically converted to the encoding set for the file with the
ENCODINGoption.A hexadecimal value is limited to 10 bytes (not characters) and will not be converted.
ENCODINGEncoding of the CSV or FBV files. Default is UTF-8.
For information about supported encodings, see Supported Encodings for ETL Processes.
NULLAdditional representation of NULL values. This option is only supported for CSV files and only applies to fields not enclosed in field delimiters. Regardless of this option, an empty string in the input data always represents a NULL value.
ROW SEPARATORDefines the line break character.
'LF'(default) corresponds to the ASCII character 0x0a (Unix/Linux).'CR'corresponds to the ASCII character 0x0d (macOS).'CRLF'corresponds to the ASCII characters 0x0d and 0x0a (Windows).'NONE'means no line break. This is only allowed in FBV files.SKIPNumber of rows that will be omitted in the import. This can be useful if you have to include header information within the data files. SKIP defines rows by line breaks (defined by
ROW SEPARATOR) even if they occur inside data.TRIM,LTRIM,RTRIMDefines whether spaces are removed at the border of CSV columns.
LTRIM: from the left,RTRIM: from the right,TRIM: from both sides.By default, no spaces are removed.
Boolean values
The following boolean value pairs are automatically accepted when inserted into a boolean column:
'1/0','TRUE/FALSE','true/false','True/False','T/F','t/f','y/n','Y/N','yes/no','Yes/No','YES/NO'For more information, see EXPORT.
-
Specifies the UDF script to be used for a user-defined import. Optionally, you can define a connection or properties that will be forwarded to the script. The specified script will generate a
SELECTstatement internally that does the actual import. The script implements a special callback function that receives the import specification (for example, parameters and connection information) and returns aSELECTstatement. For more information, see User-defined IMPORT/EXPORT using UDFs.connection_def
Optional connection definition for being able to encapsulate connection information such as password. For more information, see connection_def.
WITH parameter=value...
Optional parameters to be passed to the script. Each script can define the mandatory and optional parameters it supports. Parameters are simple key-value pairs, with the value being a string.
Example:
... WITH PARAM_1='val1' PARAM_2 = 'val2';
-
Defines how many invalid rows of the source are allowed.
For example, in the case of
REJECT LIMIT 5, the statement will work fine if there are less than or equal to five invalid rows and would throw an exception after the sixth row. The exact row that causes the exception is non-deterministic and may vary.You can write the faulty rows into a CSV file (not FBV) or to a local table within Exasol to process or analyze them later.
An optional expression can be specified for identification reasons in case you use the same error table or file multiple times. You can also use CURRENT_TIMESTAMP for this.
TableFor every faulty row, the following columns are created: row number, error message, [expression], and a truncated flag, followed by the actual data. The truncated flag indicates whether the data was truncated to the maximum string length.
CSV fileFor every faulty row, a comment row is created with the row number, error message, [expression], followed by the actual data row. Constraint violation errors will throw an exception even if the
REJECT LIMIThas not been reached.
Examples
Import from local files
To learn more about importing files from local or remote systems, see Load data from local or remote files.
-- Import data from local csv file
-- using semicolon as separator and skipping the first 5 lines
IMPORT INTO my_table
FROM LOCAL CSV FILE '~/my_table.csv'
COLUMN SEPARATOR = ';' SKIP = 5
;-- Import data from local csv file
-- with custom datetime format for column 7 and error clause
IMPORT INTO my_table
FROM LOCAL CSV
FILE 'C:\Data\f3.csv.zip' (1..6, 7 FORMAT = 'YYYY-MM-DD HH24:MI:SS:FF3', 8..9)
COLUMN SEPARATOR = ';'
ROW SEPARATOR = 'CRLF'
COLUMN DELIMITER = '"'
ENCODING = 'UTF-8'
SKIP = 1
ERRORS INTO error_table (CURRENT_TIMESTAMP) REJECT LIMIT UNLIMITED
;-- Import from local Parquet file, using the CONFIG clause to
-- specify the number of connections and simultaneous buffers
-- and restrict concurrent reads to 1 (required for local import)
IMPORT INTO my_schema.my_table
    FROM LOCAL PARQUET
    CONFIG 'MaxConnections=2;MaxBatchFetchSize=1;MaxConcurrentReads=1'
    FILE '/home/user/test.parquet'
;Import from remote file servers
To prevent connection details from being exposed in logs and audit tables, we recommend that you always create a connection object using CREATE CONNECTION and authenticate using the saved connection instead of providing the details openly in the IMPORT/EXPORTstatements.
To learn more about importing files from local or remote systems, see Load data from local or remote files.
-- Import data from two CSV files on a web server using TLS/SSL certificate

CREATE OR REPLACE CONNECTION my_fileserver
    TO 'https://192.168.1.2:8080/'
    USER 'my_user' IDENTIFIED BY 'my_secret'
    VERIFY CERTIFICATE PUBLIC KEY 'my_public_key'
;

IMPORT INTO my_table
    FROM CSV
    AT 'my_fileserver'
    FILE 'tab1_part1.csv' FILE 'tab1_part2.csv'
    COLUMN SEPARATOR = ';'
    SKIP = 5
;-- Import data from FBV file on FTP server
CREATE OR REPLACE CONNECTION my_fileserver
TO 'ftp://192.168.1.2/'
USER 'my_user' IDENTIFIED BY 'my_secret'
;
IMPORT INTO my_table
FROM FBV
AT my_fileserver
FILE 'tab2_part1.fbv'
(SIZE=8 PADDING='+' ALIGN=RIGHT,
SIZE=4,
SIZE=8,
SIZE=32 FORMAT='DD-MM-YYYY' )
;-- Import from a CSV file on a Hadoop node
IMPORT INTO my_table
FROM CSV
AT 'http://HadoopNode:50070/webhdfs/v1/tmp'
FILE 'file.csv?op=OPEN&user.name=user'
;Import from external data sources
To prevent connection details from being exposed in logs and audit tables, we recommend that you always create a connection object using CREATE CONNECTION and authenticate using the saved connection instead of providing the details openly in the IMPORT/EXPORTstatements.
To learn more about importing from external data sources, see Load data from external sources.
-- Import data from an Oracle database

CREATE OR REPLACE CONNECTION my_oracle
    TO '(DESCRIPTION =
            (ADDRESS_LIST =
                (ADDRESS =
                    (PROTOCOL = TCP)
                    (HOST = 192.168.0.25)
                    (PORT = 1521)
                )
            )
            (CONNECT_DATA = (SERVICE_NAME = orautf8))
        )'
;

IMPORT INTO my_table (col1, col2, col4)
    FROM ORA
    AT my_oracle
    USER 'my_user' IDENTIFIED BY 'my_secret'
    STATEMENT ' SELECT * FROM orders WHERE order_state=''OK'' '
    ERRORS INTO error_table (CURRENT_TIMESTAMP) REJECT LIMIT 10
;-- Import data from Microsoft SQL Server using JDBC
CREATE OR REPLACE CONNECTION my_msql_conn
TO 'jdbc:sqlserver://dbserver;databaseName=testdb'
USER 'my_user' IDENTIFIED BY 'my_secret'
;
IMPORT INTO my_table
FROM JDBC DRIVER='MSSQLServer'
AT my_sql_conn
STATEMENT ' SELECT * FROM orders WHERE order_state=''OK'' '
;-- Import data from another Exasol database,
-- using multiple hosts for parallelization
CREATE OR REPLACE CONNECTION my_exa_connection
TO '192.168.6.11,192.168.6.12:8563;HostTimeOut=1000;Encryption=Y'
USER 'my_user' IDENTIFIED BY 'my_secret'
;
IMPORT INTO my_table
FROM EXA
AT "my_exa_connection"
USER 'my_user' IDENTIFIED BY 'my_secret'
TABLE my_schema.my_table
;-- Import data using a UDF script for HCatalog (Hadoop)
IMPORT INTO my_table
FROM SCRIPT etl.import_hcat_table
WITH HCAT_DB = 'default'
HCAT_TABLE = 'my_hcat_table'
HCAT_ADDRESS = 'hcatalog-server:50111'
HDFS_USER = 'hdfs'
;Import from cloud storage services
To prevent connection details from being exposed in logs and audit tables, we recommend that you always create a connection object using CREATE CONNECTION and authenticate using the saved connection instead of providing the details openly in the IMPORT/EXPORTstatements.
To learn more about supported authentication methods and options when importing files from cloud storage, see Load data using IMPORT.
Amazon S3 on AWS
-- Import data from csv file in Amazon S3 bucket

CREATE OR REPLACE CONNECTION my_s3_bucket
    TO 'https://my_s3_bucket.s3.eu-west-1.amazonaws.com'
    USER 'my_user' IDENTIFIED BY 'my_secret_key'
;

IMPORT INTO my_table
    FROM CSV
    AT my_s3_bucket
    FILE 'file.csv'
;
Azure Blob Storage
-- Import data from CSV file in Azure Blob Storage

CREATE OR REPLACE CONNECTION my_blob_conn
    TO 'DefaultEndpointsProtocol=https;EndpointSuffix=core.windows.net'
    USER 'my_account_name'
    IDENTIFIED BY 'my_account_key'
;

IMPORT INTO my_table FROM CSV
    AT CLOUD AZURE BLOBSTORAGE my_blob_conn
    FILE 'my_container/my_blob'
;
Authorization in Azure with SAS token or Microsoft Entra ID (AAD) is supported in Exasol 2026.1.0 and later. For more details, see Load data from Azure Blob Storage.
-- Import from Azure Blob Storage using SAS token for authentication

CREATE OR REPLACE CONNECTION my_blob_conn
    TO 'DefaultEndpointsProtocol=https;EndpointSuffix=core.windows.net'
    USER '<AccountName>' SAS TOKEN '<SASToken>'
;

IMPORT INTO table1
    FROM CSV AT CLOUD AZURE BLOBSTORAGE my_blob_conn
    FILE '<container>/<blob>'
;-- Import from Azure Blob Storage using Entra ID (AAD)
CREATE OR REPLACE CONNECTION my_blob_conn
TO 'DefaultEndpointsProtocol=https;EndpointSuffix=core.windows.net'
USER '<AccountName>' IDENTIFIED BY '<ClientSecret>'
CLIENT ID '<ClientId>'
TENANT ID '<TenantId>'
;
IMPORT INTO table1
FROM CSV AT CLOUD AZURE BLOBSTORAGE my_blob_conn
FILE '<container>/<blob>'
;Google Cloud Storage
-- Import data from csv file on Google Cloud Storage

CREATE OR REPLACE CONNECTION my_gcs_connection
    TO 'https://testbucket.storage.googleapis.com'
    USER 'my_access_id'
    IDENTIFIED BY 'my_secret'
;

IMPORT INTO my_table FROM CSV
    AT my_gcs_connection
    FILE 'my_path/file.csv'
;
Parquet file in Amazon S3 bucket
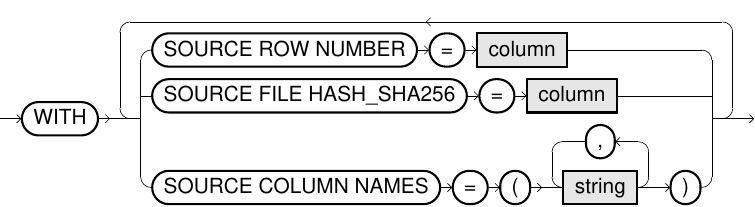
The latest version of Exasol supports importing Parquet files from any S3-compatible storage. For more details and examples of importing Parquet files from cloud storage, see Importing Parquet files.
-- 1) Create a connection to an Amazon S3 bucket using a session token
-- 2) Create a schema and a table with columns for row tracking metadata
-- 3) Import data from two Parquet files into "my_table", storing
--    metadata for the source file hash in the "sourcefile" column
--    and source file row position in the "rownumber" column

CREATE OR REPLACE CONNECTION my_conn
    TO 'https://my_s3_bucket.s3.eu-west-1.amazonaws.com'
    USER 'my_user' IDENTIFIED BY 'my_secret_key'
    SESSION TOKEN 'my_session_token'
;

DROP SCHEMA IF EXISTS my_schema CASCADE;
CREATE SCHEMA my_schema;
CREATE TABLE my_schema.my_table (sourcefile HASHTYPE (256 BIT), c1 INT, rownumber INT)
;

IMPORT INTO my_schema.my_table
    FROM PARQUET
    AT my_conn
    FILE 'nested/path/to/test_1.parquet' FILE 'nested/path/to/test_2.parquet'
    WITH
        SOURCE FILE HASH_SHA256 = sourcefile
        SOURCE ROW NUMBER = rownumber
;
Parquet file in Azure Blob Storage
CREATE OR REPLACE CONNECTION my_conn
    TO 'DefaultEndpointsProtocol=https;EndpointSuffix=core.windows.net'
    USER '<AccountName>' IDENTIFIED BY '<AccountKey>';

IMPORT INTO table1
    FROM PARQUET AT CLOUD AZURE BLOBSTORAGE my_conn
    FILE '<container>/test.parquet';
Import using SELECT result set
The following examples use stored connections.
-- getting a result set using IMPORT (which can also be used as a sub-select)

SELECT * FROM (
IMPORT INTO (i INT, v VARCHAR(200)) FROM EXA
    AT my_exasol
    TABLE MY_SCHEMA.MY_TABLE
);-- result set IMPORT without INTO clause
IMPORT FROM JDBC
AT my_jdbc_conn
STATEMENT ' SELECT * FROM orders WHERE order_state=''OK'' ';-- result set IMPORT with INTO and LIKE clause
IMPORT INTO (LIKE CAT) FROM JDBC
AT my_exa_conn
STATEMENT ' SELECT OBJECT_NAME, OBJECT_TYPE FROM EXA_USER_OBJECTS WHERE OBJECT_TYPE IN (''TABLE'', ''VIEW'') ';