Create the First Data Node
Previous step: Create Monitoring Service
After you have created a monitoring service, you can create the first data node. The settings that you configure here can be copied to create further nodes in the system.
To create the first data node, you have to perform the following tasks:
IP address numbering
When you create a new node, you assign it an internal number and an external number. These numbers determine the IP address of the node on the private and public networks respectively.
- Node number: Determines the last octet of the node’s IP address on the private network (cluster-internal network).
- External number: Determines the last octet of the node’s IP address on the public network (client-side network). This is done by adding the external number assigned to the node to the last octet of the public network address.
Example:
Public IP address + External Number = Node IP address
| Public network IP | Network mask | External number | Node IP |
|---|---|---|---|
| 10.70.0.50 | 255.255.255.0 (24) | 34 | 10.70.0.84 |
| 10.70.0.70 | 255.255.255.0 (24) | 1 | 10.70.0.71 |
Disk layout
The disk layout for a node is configured during the node setup. For a data node, the following four partitions are required:
- OS partition (d00_os): EXACluster OS is installed on this partition. It is an ext4 filesystem with journaling, and is AES 256 encrypted. It should be assigned at least 50 GiB of space.
- Swap partition (d01_swap): Used for swap data. It should be assigned at least 4 GiB of space.
- Data partition (d02_data): Used for database logs and coredumps. It is an ext4 filesystem with journaling. It should be assigned at least 50 GiB of space.
- EXAStorage partition (d03_storage): Used for persistent and temporary database data. It is an EXAStorage partition and runs on one or more physical disks.
For a physical cluster, how you set up your disk layout depends on the hardware setup you have selected - a RAID Mirror with a Software RAID, or a hard drive with a dedicated OS disk.
RAID mirror with software RAID
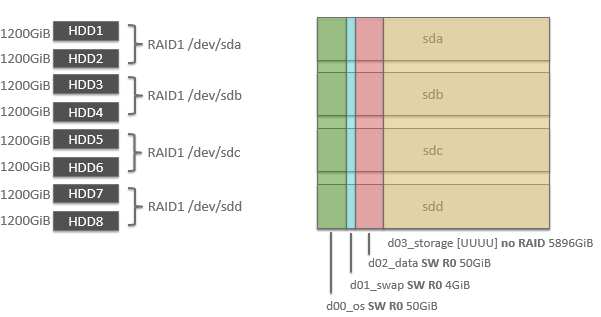
All hard drives are the same size, and are used by all partitions (OS, Data, Swap and Storage). You configure the node disks as follows:
- Add all disks to the OS, Swap, Data and Storage partitions
- OS, Swap and Data have a disk RAID of 'RAID 0'
- Storage has a disk RAID of 'None'
Example : RAID mirror with software RAID (Dell R710)
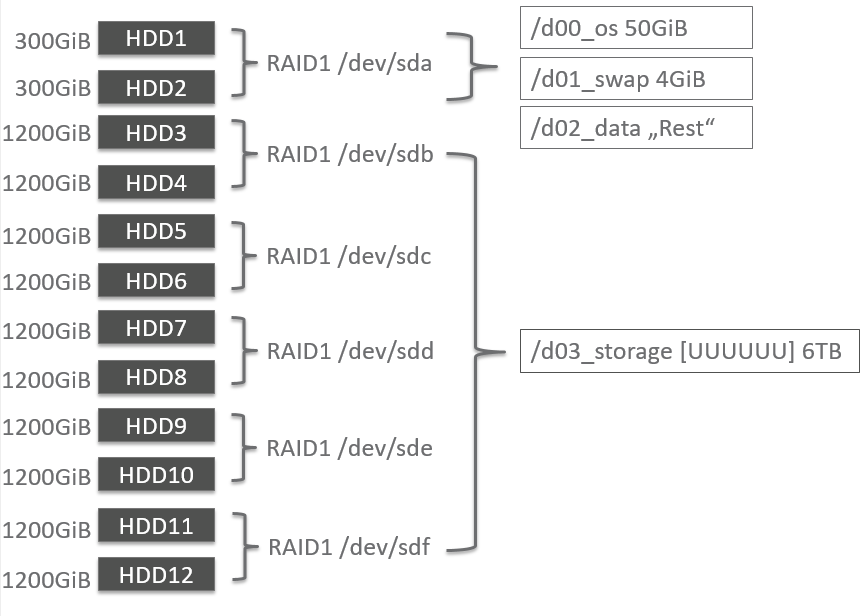
HDD with dedicated OS disk
The OS, Swap and Data partitions have a dedicated hard drive. The hard drive for these partitions is usually smaller than the hard drives for the Storage partition. You configure the node disks as follows:
- Add the dedicated hard drive to the OS, Swap and Data partitions
- Add all other hard drives to the Storage partition
- OS, Swap and Data use the dedicated OS disk
- Storage has a disk RAID of 'None'
Example : HDD with dedicated OS disk (Dell R720XD)
Create a node
Follow these steps to create/add node(s) to the Exasol system:
- In EXAoperation, go to Configuration > Nodes. The Cluster Nodes screen is displayed.
- Click Add. The Add EXACluster node screen is displayed.
- Configure the details of the node being added. For a full description of each property, refer to Configure node properties section.
- Click Add to add the node. The new node is listed with the status To Install.


Configure the node disk layout
You can follow the below steps to configure a node disk layout:
- In EXAoperation, go to Configuration > Nodes and click on the node link.
- The Node Information screen is displayed.
- Click Disks. The Disk Information screen is displayed.
- Click Edit to edit the disk. Configure the following for each partition:
- Disk devices: The physical disk(s) that the storage disk runs on. Click Add for each device to add to the partition.
- Disk RAID: Redundancy of the disk.
- Disk encryption: Select the encryption to be used for the partition.
- Disk Label: Name for the partition as it should appear in screens across EXAoperations.
- Size of disk: The maximum space in GiB available to the partition.
The way you configure the disks depends on your hardware setup (refer to Disk Layout). You have the following two options:
RAID mirror with software RAID
Partition Disk device to assign Disk RAID Disk size OS All RAID 0 50GiB Swap All RAID 0 4GiB Data All RAID 0 50 GiB Storage All Select 'None' Leave blank Hard drive with dedicated OS disk
Partition Disk device to assign Disk RAID Disk size OS Dedicated HDD Select 'None' 50GiB Swap Dedicated HDD Select 'None' 4GiB Data Dedicated HDD Select 'None' Leave blank Storage Dedicated HDD Select 'None' Leave blank - Click Apply to save your changes.
Install a node
Follow these steps to install node(s).
- In EXAoperation, go to Configuration > Nodes to open the Cluster Nodes screen.
- Start the node up so that it can complete the installation process. Depending on if you use IPMI or not, you have two options:
- Go to Configuration > Nodes.
- Select the new node and select Startup from the Actions ... drop down list.
- Click Execute to install the node and start it up
- The node is shown as Running in the State/Op. column.
The node you have just added should be displayed as To Install in the State/Op. column. If not, select the node, and select Set Install Flag from the Actions ... drop down list, and click Execute.
.png "Node To Install")
| Option | Steps |
|---|---|
| No IPMI installed: start node manually | Physically power on the relevant node in the cluster. |
| IPMI is installed: start node using EXAoperation |
|
