Migrate from Exasol 7.1
Learn how to migrate an Exasol 7.1 database to the newest version of Exasol.
Introduction
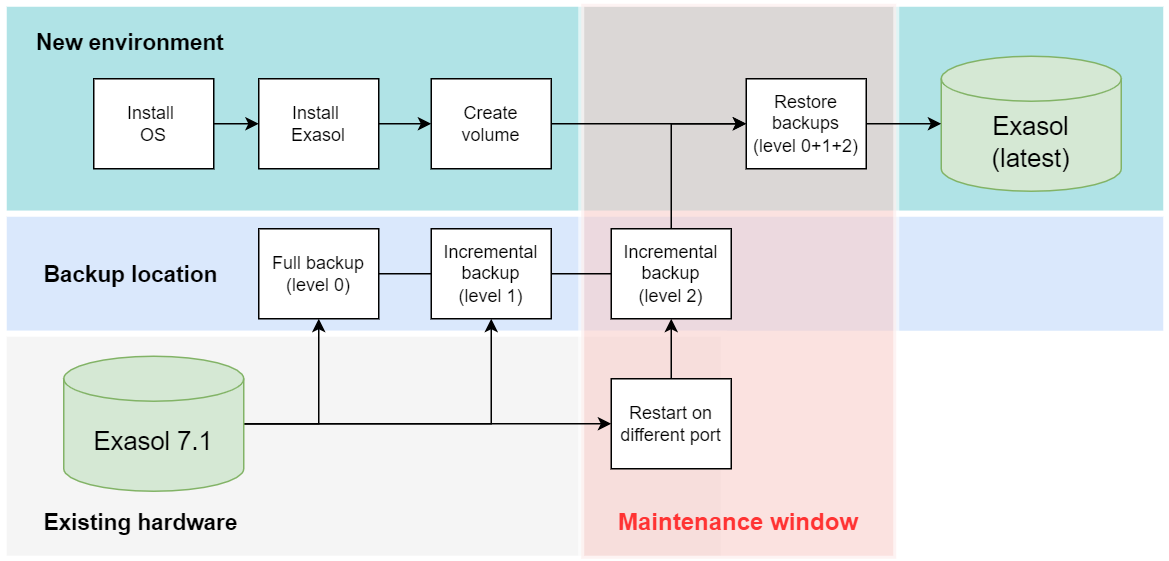
Because of the changes in architecture introduced with Exasol 8, there is no direct update path from Exasol 7.1 to later versions. Instead, you must create a new Exasol deployment, and then restore a full backup of your existing Exasol 7.1 database on the new (empty) database.
If you have an on-premises installation of Exasol 7.1 that meets the system requirements for Exasol 8, you can create the new deployment on your existing hardware. You can also choose to deploy Exasol 8 on new hardware or on cloud instances on AWS, Azure, or Google Cloud.
Deploying on existing hardware will require a longer maintenance window, since you need to take your database offline while installing an operating system and Exasol software. You will also have to reinstall Exasol 7.1 and restore from backup in case the migration fails. If you are migrating to new hardware, you can simply put the old cluster online again to resume operations while you troubleshoot.
This section describes the general procedure for both migration scenarios.
To avoid excessive downtime and prevent a risk of accidental data loss, read through the instructions in this section and in Update considerations carefully before you start the migration procedure.
If your database is running Exasol 7.0, you must update to Exasol 7.1 before proceeding. For more information, see Update from Exasol 7.0 to Exasol 7.1.
Maintenance window
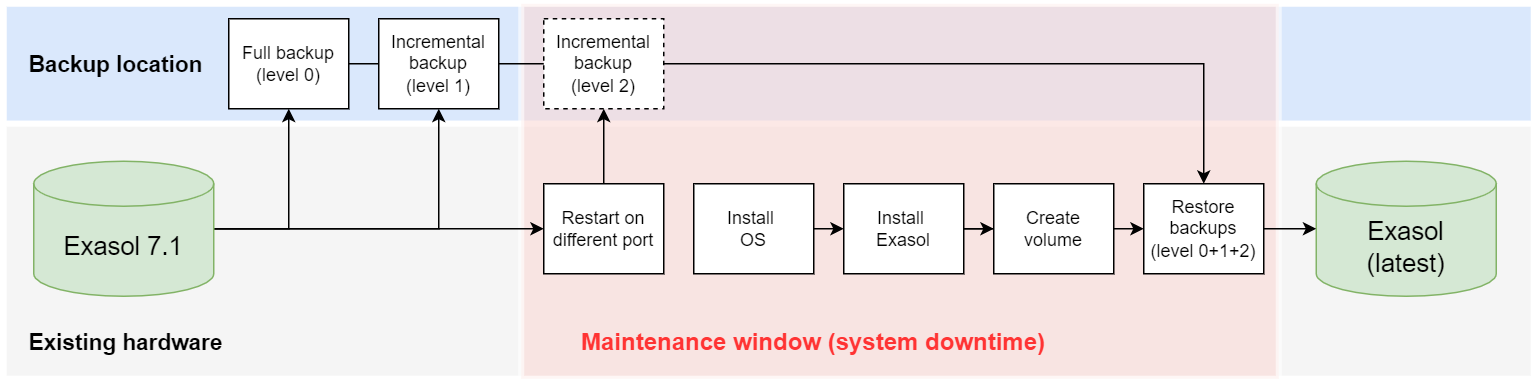
The process of migrating your database to Exasol includes a planned maintenance window when the database is not available to users. The downtime begins at the step when you restart the database on a different port and ends when the backup has been successfully restored in Exasol.
The total required downtime is mainly determined by the restore time, since the majority of the backup time will be outside of the maintenance window. A restore operation will usually take approximately the same amount of time as the backup.
Tables with partitioning will have zone maps enabled by default when they are restored in the Exasol 8 database. This can take some time depending on the contents of the table. To learn more, see Zone maps.
Example:
| Operation | Time required for operation | Database downtime required |
|---|---|---|
| Create level 0 backup | 5 hours | 0 |
|
Create level 1 backup |
30 minutes | 0 |
| Create level 2 backup | 30 minutes | 30 minutes |
|
Restore full backup (level 0 + 1 + 2) |
5 hours | 5 hours |
| Total downtime required for backup/restore operations | 5 hours 30 minutes | |
You should also factor in the time that will be required for additional operations such as stopping and starting the database, and for reverting to the previous version in case the migration fails. Also consider factors in your system environment that might affect the operation, such as network capacity.
FAQ
Here are some frequently asked questions (and answers) relating to the process of migrating from Exasol 7.1 to the newest version of Exasol. You can find more details in the various sections and articles in this documentation. If you need more information or need help with the migration procedure, create a support case to contact our Support team.
-
What versions of Exasol are available?
-
Exasol can be installed as a Linux application on hardware or on virtual instances in AWS, Azure, and GCP.
-
Can I use my existing Exasol 7.1 license?
-
No. Exasol 7.1 licenses are not valid in Exasol 8 or later because of differences in the license format. For information about how to obtain a valid license, create a support case.
-
I have Platinum Support or Cluster Administration Service. Will Exasol still manage the OS patches?
-
No. Exasol is provided as a software package that you can install on your own hardware or on cloud instances, using one of the supported Linux distributions. Exasol services do not cover the management of the operating system.
-
Where can I see what has changed between my current version and the latest Exasol version?
-
The release notes for all currently supported Exasol database releases are found in Release notes - Exasol 8 rolling releases.
Each release note only describes the changes that are introduced with that specific release. To see all the changes between your current version of Exasol and the version that you are updating to, you must read the release notes for all the interim releases.
-
How long will the maintenance window be for a migration to the newest version of Exasol?
-
The downtime will depend on the restore time and, if necessary, the software installation time. To learn more, see Maintenance window and the articles in this section that describe different migration scenarios.
-
Does Exasol still come with EXAoperation?
-
No. Exasol instead has several powerful APIs and configuration/installation tools. To learn more, see Administration interfaces.
Exasol Admin is a new web-based administration interface in Exasol 2025.1 and later that makes it easy to carry out common administration tasks such as monitoring your database, generating and analyzing logs, creating backup schedules, updating Exasol, and managing files in BucketFS. For more information, see Exasol Admin.
-
Is a Management Server (License Server) still required?
-
No. Exasol does not use a separate server for cluster management anymore. The administrative interfaces are available on all nodes.
-
Does Exasol still offer a monitoring service?
-
Yes. For more information, contact Support.