Create a database
This article explains how to create a database.
We recommend that you do not run multiple Exasol databases on the same node on a production system. Since each database instance assumes it has full control over the node resources (storage, CPUs, network), running multiple databases on the same node may result in unpredictable behavior and performance issues.
Assigning Nodes to a Database
When you create a database, you assign the number of active nodes and specify the nodes that it will use (both active and reserve). The following principles apply:
-
All nodes (both active and reserve) that the database will use must be added to the Node List.
-
The number of Active Nodes that you specify here must be the same as the Number of Master Nodes you specified when setting up the data volume for the database.
For more information, see also Create Local Archive Volume and Create Remote Archive Volume.
-
For a cluster that contains reserve nodes, active nodes and reserve nodes are specified by a combination of the Active Nodes and Node List fields on the Add Database screen. If the number of active nodes is less than the number of nodes added to the Node List, the extra nodes are used as reserve nodes.
Assigning RAM to a Database
The amount of RAM the database can make use of is specified in the DB RAM (GiB) field. The amount of DB RAM that you can assign is limited by the following factors:
-
The license that you have purchased may define the maximum RAM you can use per database.
-
The combined RAM of the active data nodes limits the maximum RAM you can assign to the database.
You can assign a maximum of 90% of the available RAM to the database, since 10% should be reserved for the operating system.
If you do not know the available RAM in the cluster, you can calculate it as follows:
-
Go to Configuration > Nodes. The RAM for each node is listed in the Info column.
-
Sum the values of the RAM for each active node together. This is the total RAM available to the cluster.
-
Calculate 90% of the total RAM. This is the maximum RAM you can assign to the database. The value must be less than your license limit.
-
Create the Database
Follow these steps to create a database:
- In EXAoperation, go to Services > EXASolution and click Add.
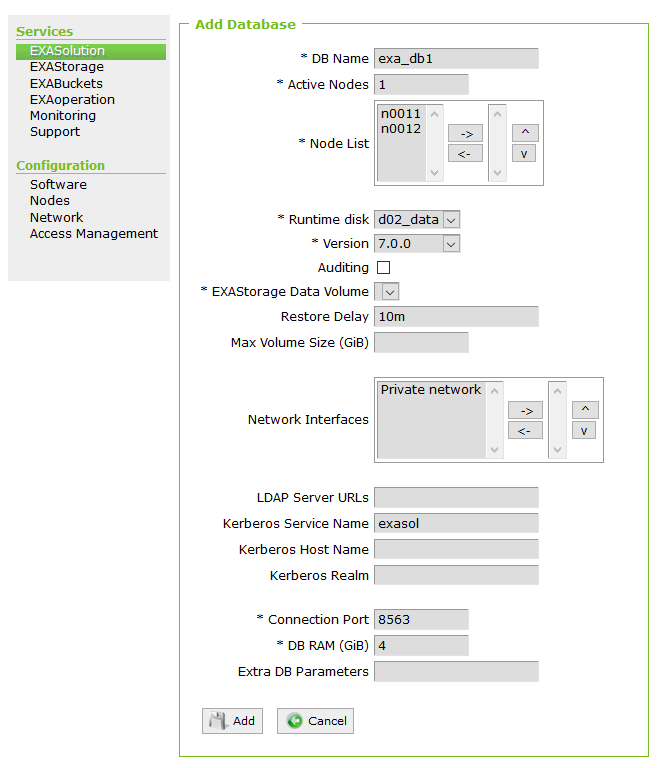
- Configure the following database properties.
Database Properties Description DB Name A label for the database, for example 'prod_db1'. Active Nodes The number of active nodes to use for the database. For example, if the system is 4+1, the number of active nodes is 4 (with one reserve node).
The value you set here must be the same as the number of nodes you set when creating the data volume (Number of Master Nodes field).
Node List Select all the nodes that the database will use, including the reserve node, and add them to the list on the right. The system recognizes the top nodes in the list based on the number of Active Nodes you specify as the active nodes. All other nodes are seen as reserve nodes.
For example, in a 4+1 setup, the number of active nodes is 4. The top 4 nodes in the Node List are active, and the remaining node is the reserve.
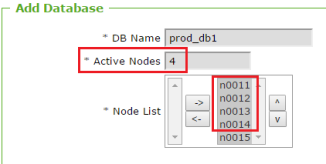
Although the number of nodes used must be the same for the data volume and database, the actual nodes used can differ. For example, if the data volume uses nodes 11,12, 13, 14 and 15, the database might use 11, 13, 14, 16 and 17.
Runtime disk Select the disk configured for 'Data' (used for database log files, etc.). Version The version of EXASolution that the database should use. This is usually the latest available version. Auditing Select this check box to save the text of all executed SQL statements (up to 2MB per statement) in the EXA_STATISTICS schema. EXAStorage Data Volume The data volume the database will run on. This is the data volume that you set up in the Create Data and Archive Volumes (Create Local Archive Volume and Create Remote Archive Volume). Restore Delay The amount of time the system will wait after a failure before restoring data to the now-active reserve node. Enter a value and a unit of time measurement ("s", "m", "h", etc.). If you enter '0', the restore will be instantaneous in the event of an outage. If you enter no value in this field, there will be no restore - the reserve node will be pushed in as per the failsafety functionality, but no data restore will occur. The recommendation is 10 minutes ("10m").
Max Volume Size (GiB) It's the maximum volume size for the database and used if there is more than one database running in the cluster. It ensures that each database has dedicated disk space available. Exasol recommends leaving this field empty if you only have one database in the cluster.
However, you need to specify this parameter if you have a disk subsystem that is used across the cluster by multiple databases. It prevents the database from using volume more than the specified value.
If the database reaches this quota, the database is shut down.
To calculate the maximum volume size, you can use the following formula.
DATA Volume Size + TEMP Volume Size = MAX Volume Size
Network Interfaces Select and add the network interfaces the database will use and add them to the list on the right.
If you select no interfaces, all available network interfaces will be used, including the public network. This can have a negative impact on performance.
LDAP Server URLs If database users will be authenticated using LDAP servers, enter the server URLs here (separated by a comma for multiple servers). Connection Port TCP software port for the database instance. DB RAM (GiB) The amount of RAM that should be made available for the database instance. Extra DB Parameters This is an optional field to specify database parameters. For example, if you specify
-forceProtocolEncryption=1, Exasol will deny connection requests from all unsecured connections.To use OpenID authentication parameters for database users, see Authenticate using OpenID.
If you want additional database parameters, contact Exasol Support.
- Click Add to add the database.

- To propagate the database to the cluster nodes, go to Services > EXASolution and click on the database instance you have just added.
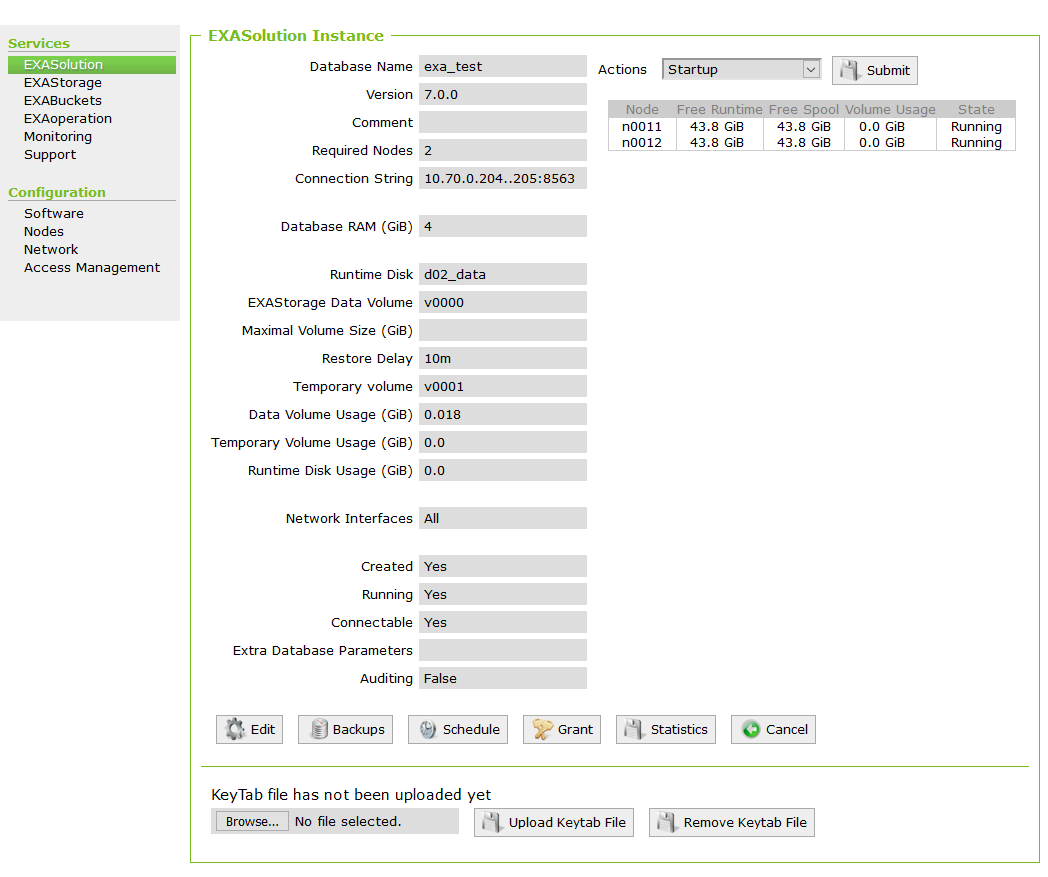
- Select Create from the Actions list box and click Submit to create the database instance.
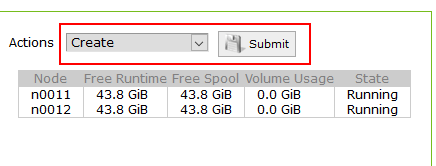
The nodes have a State of 'Selected' or 'Reserve'.
Add Database to Monitoring Log Services
During the addition of the monitoring process, you may have noticed two monitoring log services INFORMATION (WITH LOAD) and INFORMATION (WITHOUT LOAD)(refer to INFORMATION (WITHOUT LOAD) section for more details). You can add a database instance to these log services, and any others you might need it in.
Do the following for each log service that should report on the database instance:
- In EXAoperation, go to Services > Monitoring, select the relevant monitoring service, and click Edit.
- Select the database in the Database Systems and move it to the list on the right.
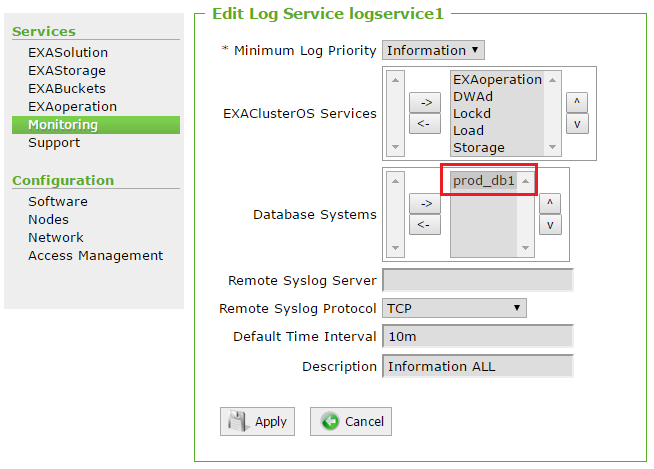
- Click Apply.
- Repeat the above steps for each logservice that you want to add the database to.
Start the Database
Do the following to start the database:
- In EXAoperation, go to Services > EXASolution.
The EXASolution Instances screen opens, where you can view the status of the database instance(s). In this case, a database instance exists, but is not running (it has a status of 'Created').
- Select the database and click Start.
Once the database is up, there is a green light beside the database name in the EXASolution screen. This indicates the database is accepting client connections.
