Upload TLS certificate
Learn how to create and upload a TLS certificate chain in EXAoperation.
Introduction

Transport Layer Security (TLS) is a cryptographic protocol that uses digital certificate chains to enable secure communication between client and server. A certificate chain consists of multiple, related certificates that are linked together using digital signatures. Each certificate in the chain is digitally signed by the previous certificate in the chain. The root certificate in the chain can be self-signed or issued by a trusted Certificate Authority (CA). The certificate chain can contain any number of intermediate certificates between the root and server certificates.
TLS certificates are used to encrypt communication between the local client and EXAoperation, between database clients and the database, and for accessing BucketFS. You can upload the certificate chain using EXAoperation or XML-RPC.
If you need help on how to generate or use TLS certificates, contact your system administrator.
Prerequisites
- A self-signed or CA-signed server certificate using either RSA or ECC encryption
-
A private key file for the server certificate
-
The root certificate and any intermediate certificates that are part of the certificate chain
If you are using RSA with a version of Exasol earlier than
The private key for the server certificate must not be encrypted with a password.
Create a certificate chain
A certificate chain is a simple text file that contains all the certificates. The ordering of the certificates in the file is important. Certificate chains begin with the server certificate and end with the root certificate. In the following example we use the cat command to create a certificate chain file that contains two certificates.
-
Copy the server certificate
server_cert.crt
to a new certificate chain filecert_chain.pem
.Copycat server_cert.crt > cert_chain.pem; -
Append the CA-issued root certificate
ca_cert.crt
to the file.Copycat ca_cert.crt >> cert_chain.pemNote that you must use
>>(append), not>(overwrite) in this step.
The file cert_chain.pem
now contains a certificate chain with a server certificate and a root certificate. The next step is to upload this file to the Exasol system together with the private key for the server certificate.
Hostnames in the server certificate
If the SQL driver is using a connection string in the format first_host..last_host:port, the exact hostnames provided in the connection string must be included in the Common Name (CN) or Subject Alternative Name (SAN) of the server certificate.
Example:
|
Driver connection string |
Include in server certificate |
|---|---|
|
|
|
|
|
|
|
|
or
|
|
|
exa-prod.mydomain
or
|
Upload certificate and key
The next step is to upload the certificate chain and the private key to the Exasol deployment.
You must upload the entire TLS certificate chain, not just the server certificate.
In EXAoperation
- Log in to EXAoperation as an admin.
- Click the TLS Certificate tab under Configuration > Access Management.
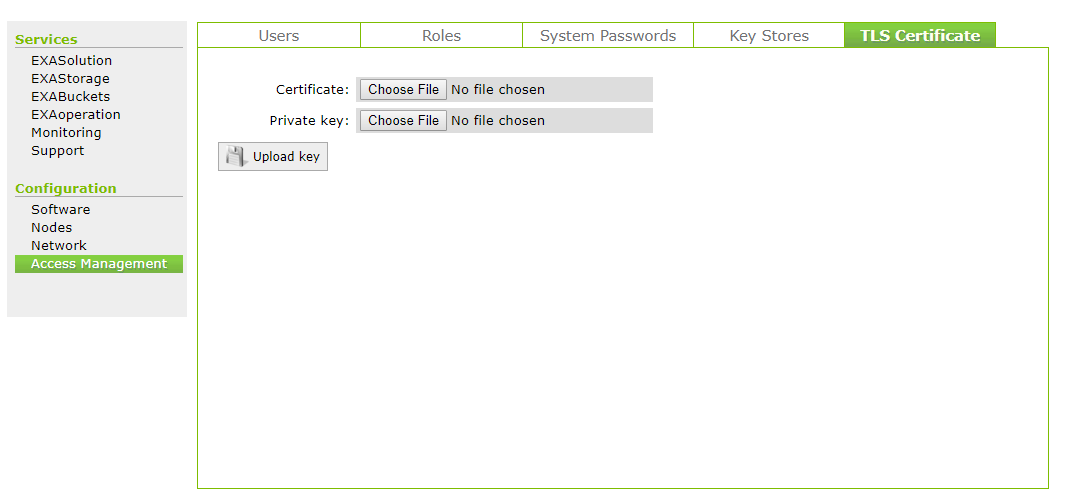
- Upload the certificate chain file and the private key file.
- Click Upload Key button.
- Go to Services > EXAoperation and click the Restart button to restart EXAoperation. Restarting EXAoperation does not impact the database's availability.
After restarting, EXAoperation uses an encrypted TLS connection.
If you upload a TLS certificate, the database automatically uses the same certificate for TLS connections between the database and other clients after a database restart.
Through XML-RPC
- Run the following commands to import the XML-RPC packages:
- Run the following command to create a connection with your Exasol cluster:
- Run the following command to upload a TLS certificate chain and private key. Replace the absolute paths and file names with your own.
- Restart EXAoperation. Restarting EXAoperation does not impact the database's availability.
from xmlrpc.client import ServerProxy
from xmlrpc.client import ServerProxy as xmlrpc
import ssl
server = ServerProxy ('https://user:password@<IP_Address>/cluster1', context=ssl._create_unverified_context (), allow_none = True)
cert = open('/absolute/path/to/cert_chain.pem', 'r').read()
key = open('/absolute/path/to/key.pem', 'r').read()

server.uploadTlsFiles(cert,key)
server.restartEXAoperation('<node>')After restarting, EXAoperation uses an encrypted TLS connection.
If you upload a TLS certificate, the database automatically uses the same certificate for TLS connections between the database and other clients after a database restart.
You can only have one TLS certificate active at a time. Uploading a new certificate overwrites a previous TLS certificate. It is not possible to delete a certificate without replacing it.
Enable a TLS certificate
All Exasol drivers use TLS as the default cryptographic protocol for all connections. By default, each Exasol database uses a self-signed certificate for TLS encryption. If your database uses the default certificate or another self-signed certificate, you may need to update your connection strings to connect to the database.
If the database has been configured to use non-default paths for certificates and keys, or if the legacy TLS library has been enabled (by setting the respective database parameters), you must restart the database after uploading a new certificate.
To use the uploaded TLS certificate for communication between database clients and the database, you must restart the database after uploading the certificate. For more information about how to restart the database, see Start a database.
Restarting the database requires a short downtime.
Fingerprint
For clients that do not support certificate verification, you can use TLS fingerprints.
When you upload a new TLS certificate and restart the database, a new fingerprint is generated. The fingerprint is immediately updated in the connection string in EXAoperation, but you must restart the database before you can connect using the new fingerprint.